User Guide
Introduction
TalentSG is a desktop application designed for HR professionals and recruiters who need to efficiently manage candidates and job roles. Built with productivity in mind, TalentSG is optimised for those who prefer a Command Line Interface (CLI) experience while still benefiting from a Graphical User Interface (GUI). This combination allows users to perform tasks through concise, text-based commands and receive visual feedback for each command executed.
TalentSG streamlines the process of tracking candidates, organizing job roles, and filtering based on status or skillsets. With a flexible command structure, users can work intuitively without having to remember overly complex commands, making TalentSG both powerful and user-friendly.
If you’re a fast typist, TalentSG can significantly speed up your candidate management workflow compared to traditional GUI-only applications. It is especially useful for those who value precision and speed, as the CLI minimises the clicks and steps required to complete various HR tasks.
This document provides an in-depth guide to using TalentSG’s features and commands, ensuring that users can maximise their experience with the app. We currently support both Windows and Mac operating systems, so feel free to jump to Quick Start to begin.
We hope TalentSG becomes an indispensable tool in your recruitment and candidate management journey!
This app is a desktop app for managing candidates and job roles, optimised for use via a Command Line Interface (CLI) while still providing the benefits of a Graphical User Interface (GUI). If you can type fast, this app can help you manage your candidates and job roles faster than traditional GUI apps.
Table of Contents
- Command Summary
- Symbols and Tips
- Quick Start
- Features
- Notes About the Command Format
- Viewing Help:
help - Adding a Person:
add - Listing All Persons:
list - Editing a Person:
edit - Finding Persons by Name:
find - Deleting a Person:
delete - Filtering Applicants by Status:
filter - Displaying Summary:
summary - Clearing All Entries:
clear - Exiting the Program:
exit - Saving Data
- Editing the Data File
- Bug Report
- Archiving Data Files
- FAQ
- Glossary
- Acknowledgements
Command Summary
| Action | Format, Examples |
|---|---|
| Add | add n/NAME p/PHONE_NUMBER e/EMAIL a/ADDRESS s/SKILLS st/STATUS [note/NOTE] ex/EXPERIENCE dr/DESIRED_ROLE [t/TAG]... e.g., add n/John P p/98765412 e/johnd@123.com a/311, Clementi Ave 2, dr/Software Engineer s/Java, Python, C++ ex/Manager at Google from 2010 st/Interviewed |
| Clear | clear |
| Delete | delete INDEXe.g., delete 3 |
| Edit | edit INDEX [n/NAME] [p/PHONE] [e/EMAIL] [a/ADDRESS] [s/SKILLS] [st/STATUS] [note/NOTE] [ex/EXPERIENCE] [dr/DESIRED_ROLE] [t/TAG]...e.g., edit 2 n/James Lee st/Applied |
| Find | find KEYWORD [MORE_KEYWORDS]e.g., find James |
| List | list |
| Help | help |
| View | view INDEXe.g., view 2 |
| Filter | filter STATUSe.g., filter Shortlisted |
| Summary | summary |
Detailed information can be found under Features.
Key Symbols and Tips for a Smooth Experience
Throughout this guide, you’ll encounter several symbols. Refer to these symbols as you explore the guide. Each provides quick insights or warnings that can make your experience smoother:
- [Tip]: Useful information to enhance your experience.
- [Note]: Important information you should be aware of.
- [Caution]: Critical information to prevent potential issues.
Quick Start
- Check Java Installation: Ensure you have Java 17 or above installed on your computer.
- Check Java version on Windows
- Check Java version on Mac
- If your computer does not have Java or its version is below Java 17, you may refer to:
- [Note]: If you’re using an older version of Java, certain features might not work as expected. Updating to the latest version is recommended.
- Download TalentSG: Get the latest
.jarfile from here.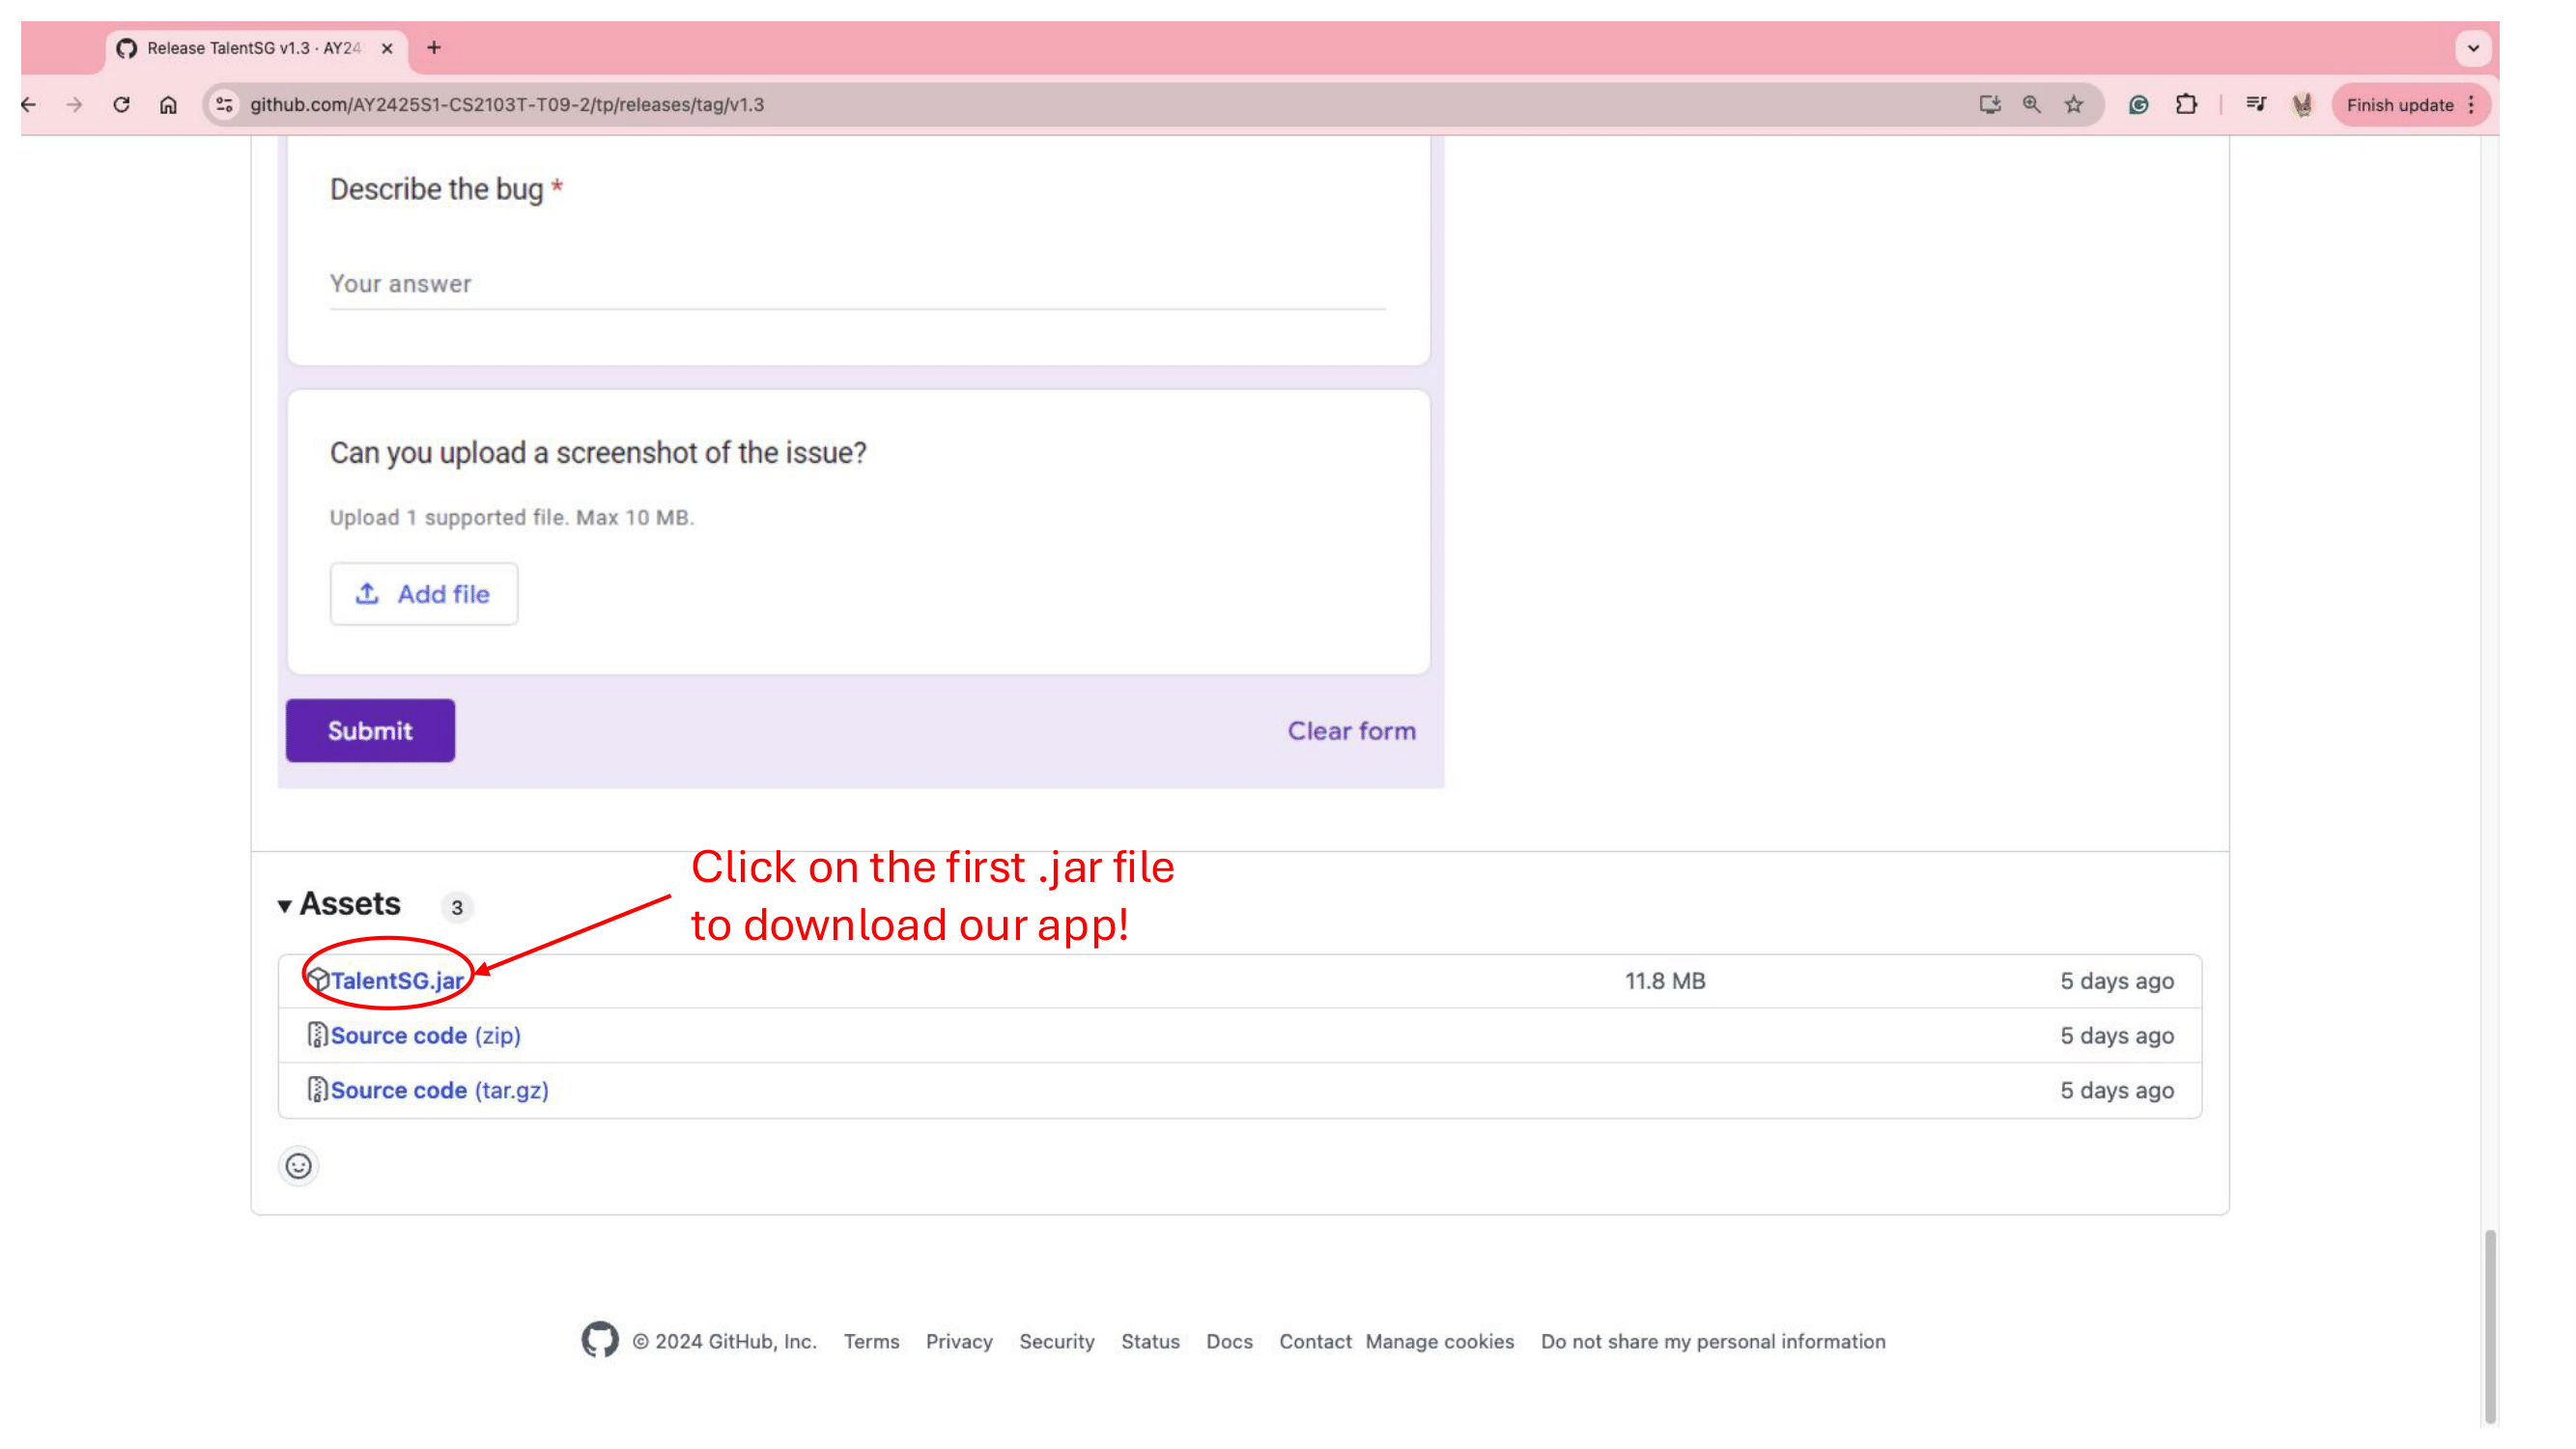 [Tip]: To avoid typing the full path every time, place the TalentSG.jar file in a frequently accessed folder or create an alias for it on your system.
- Set Up Home Folder: Copy the
TalentSG.jarfile to the Desktop to launch. - Run the Application:
- Open a command terminal.

- Navigate (
cd) to the folder containing the.jarfile.
Example:cd C:\Users\[username]\Downloads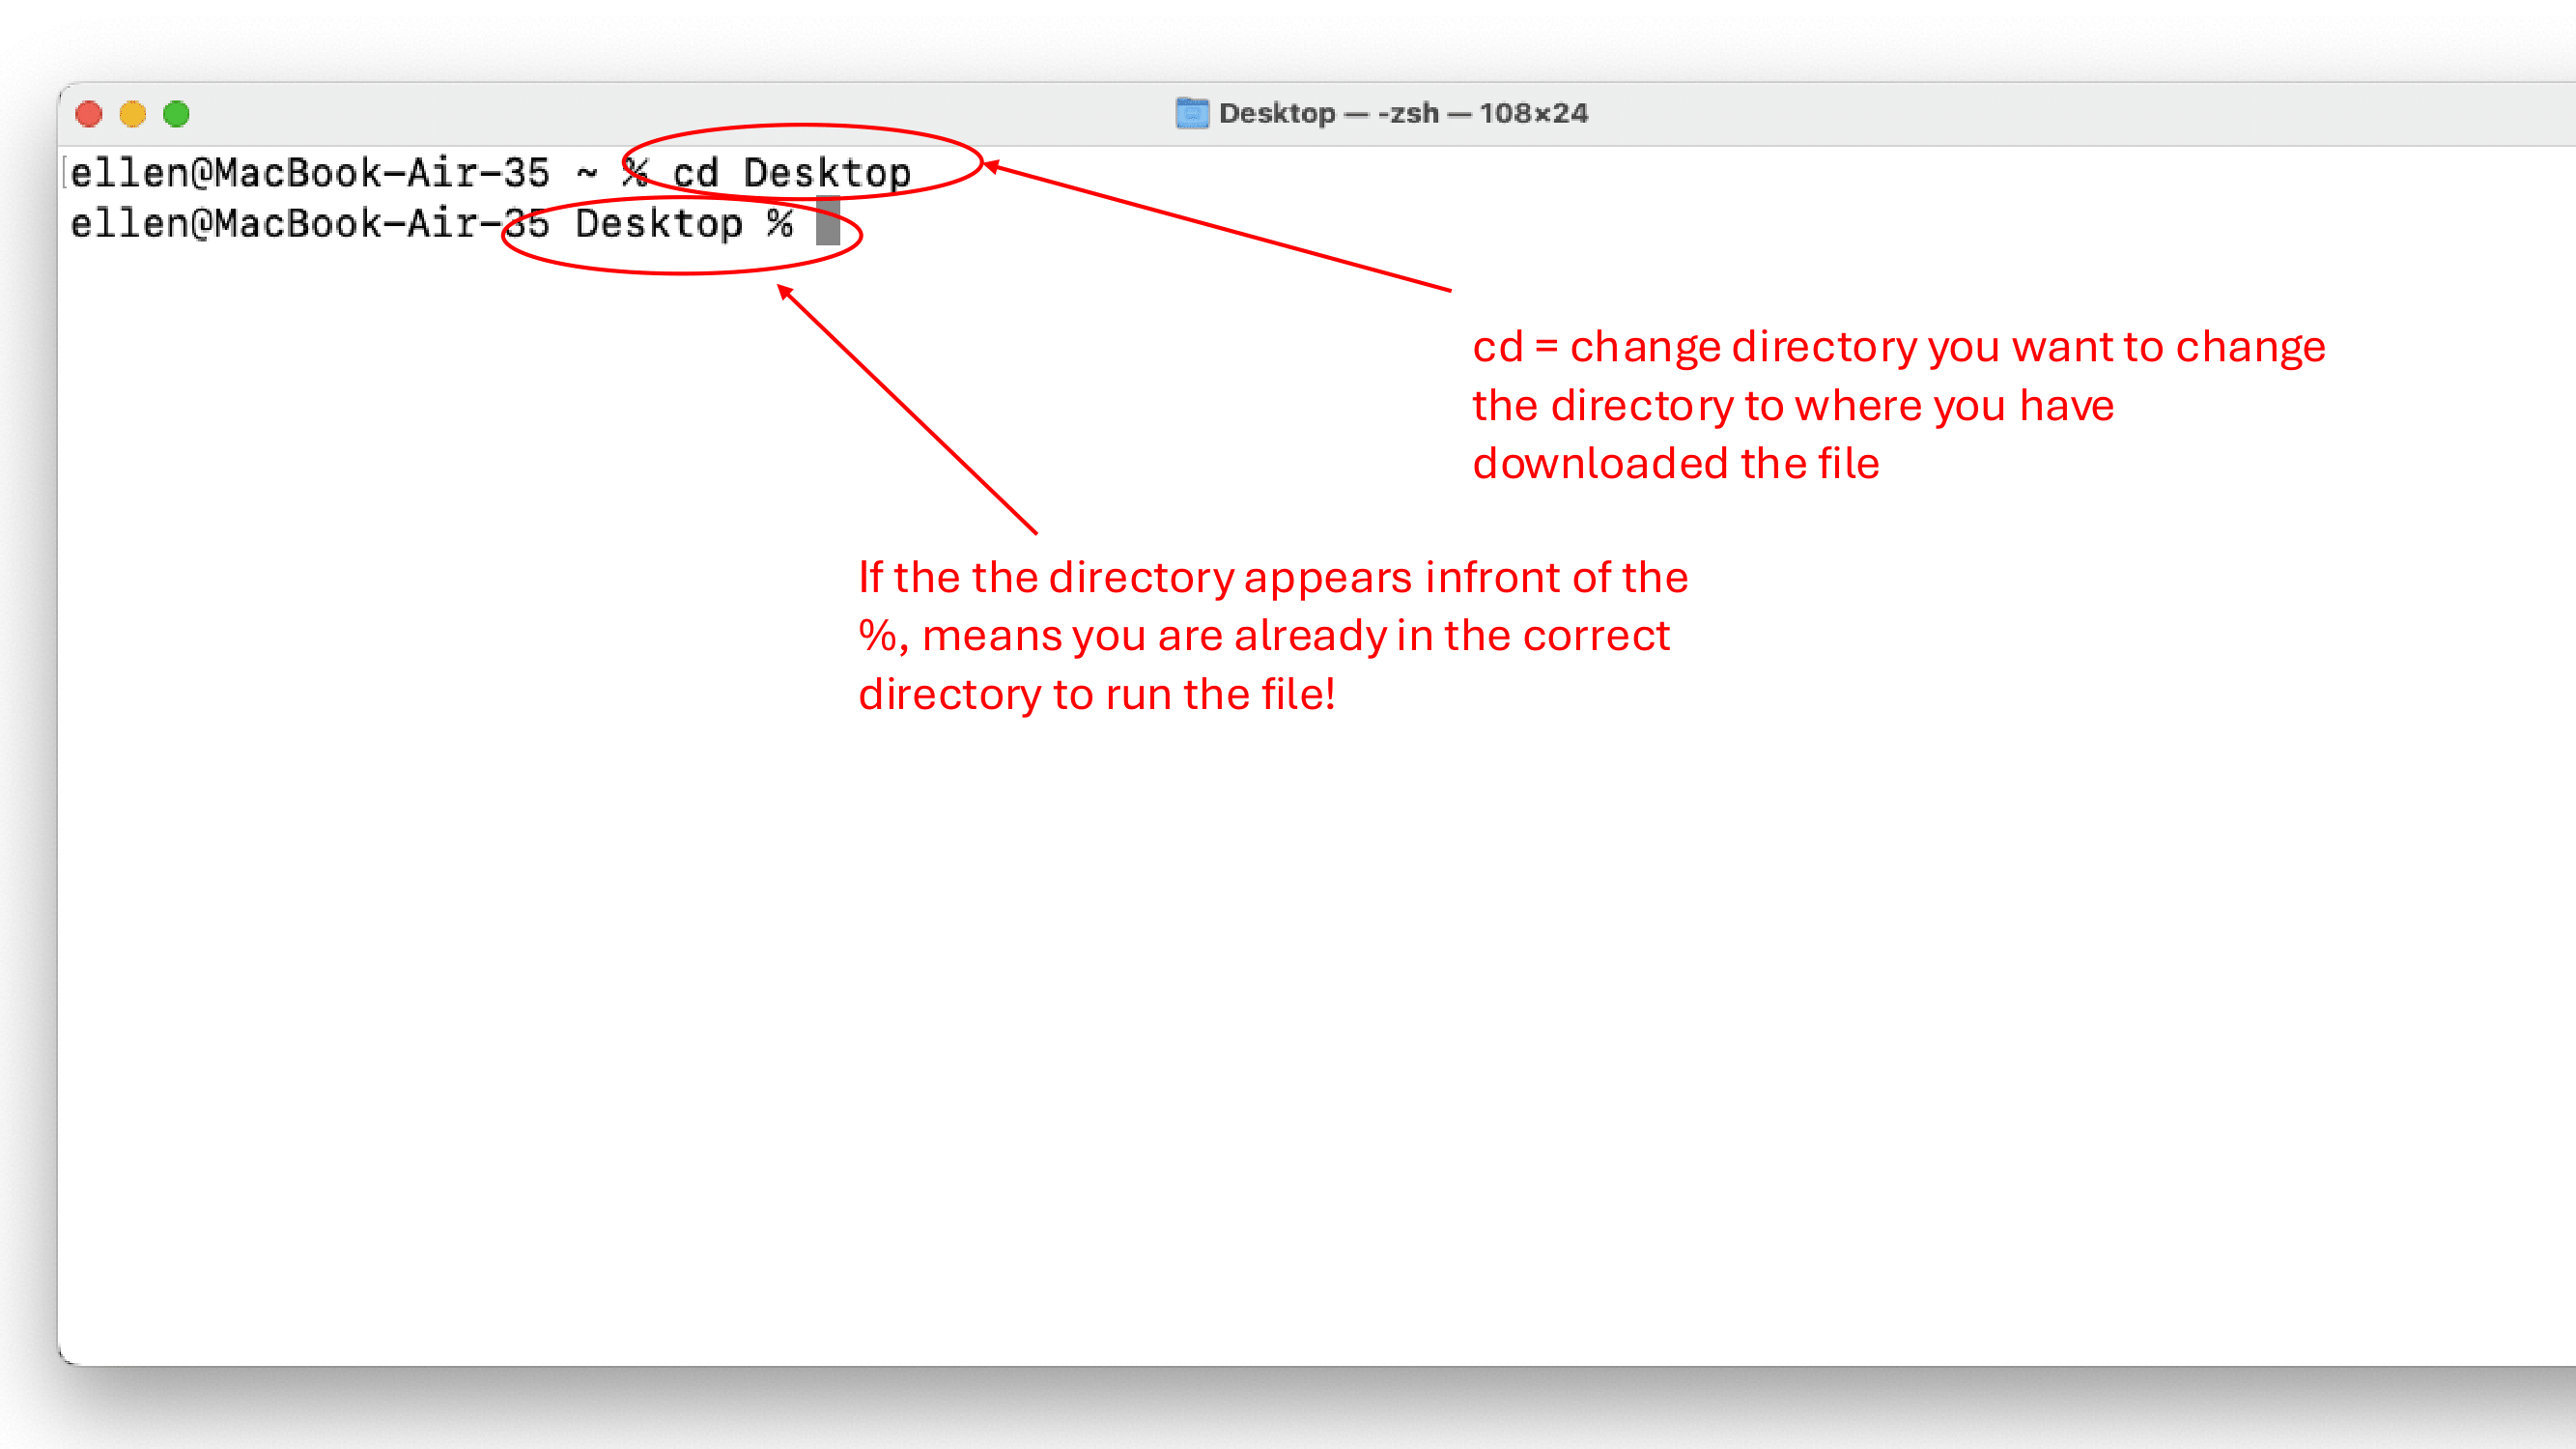
- Run the application with the command:
java -jar TalentSg.jar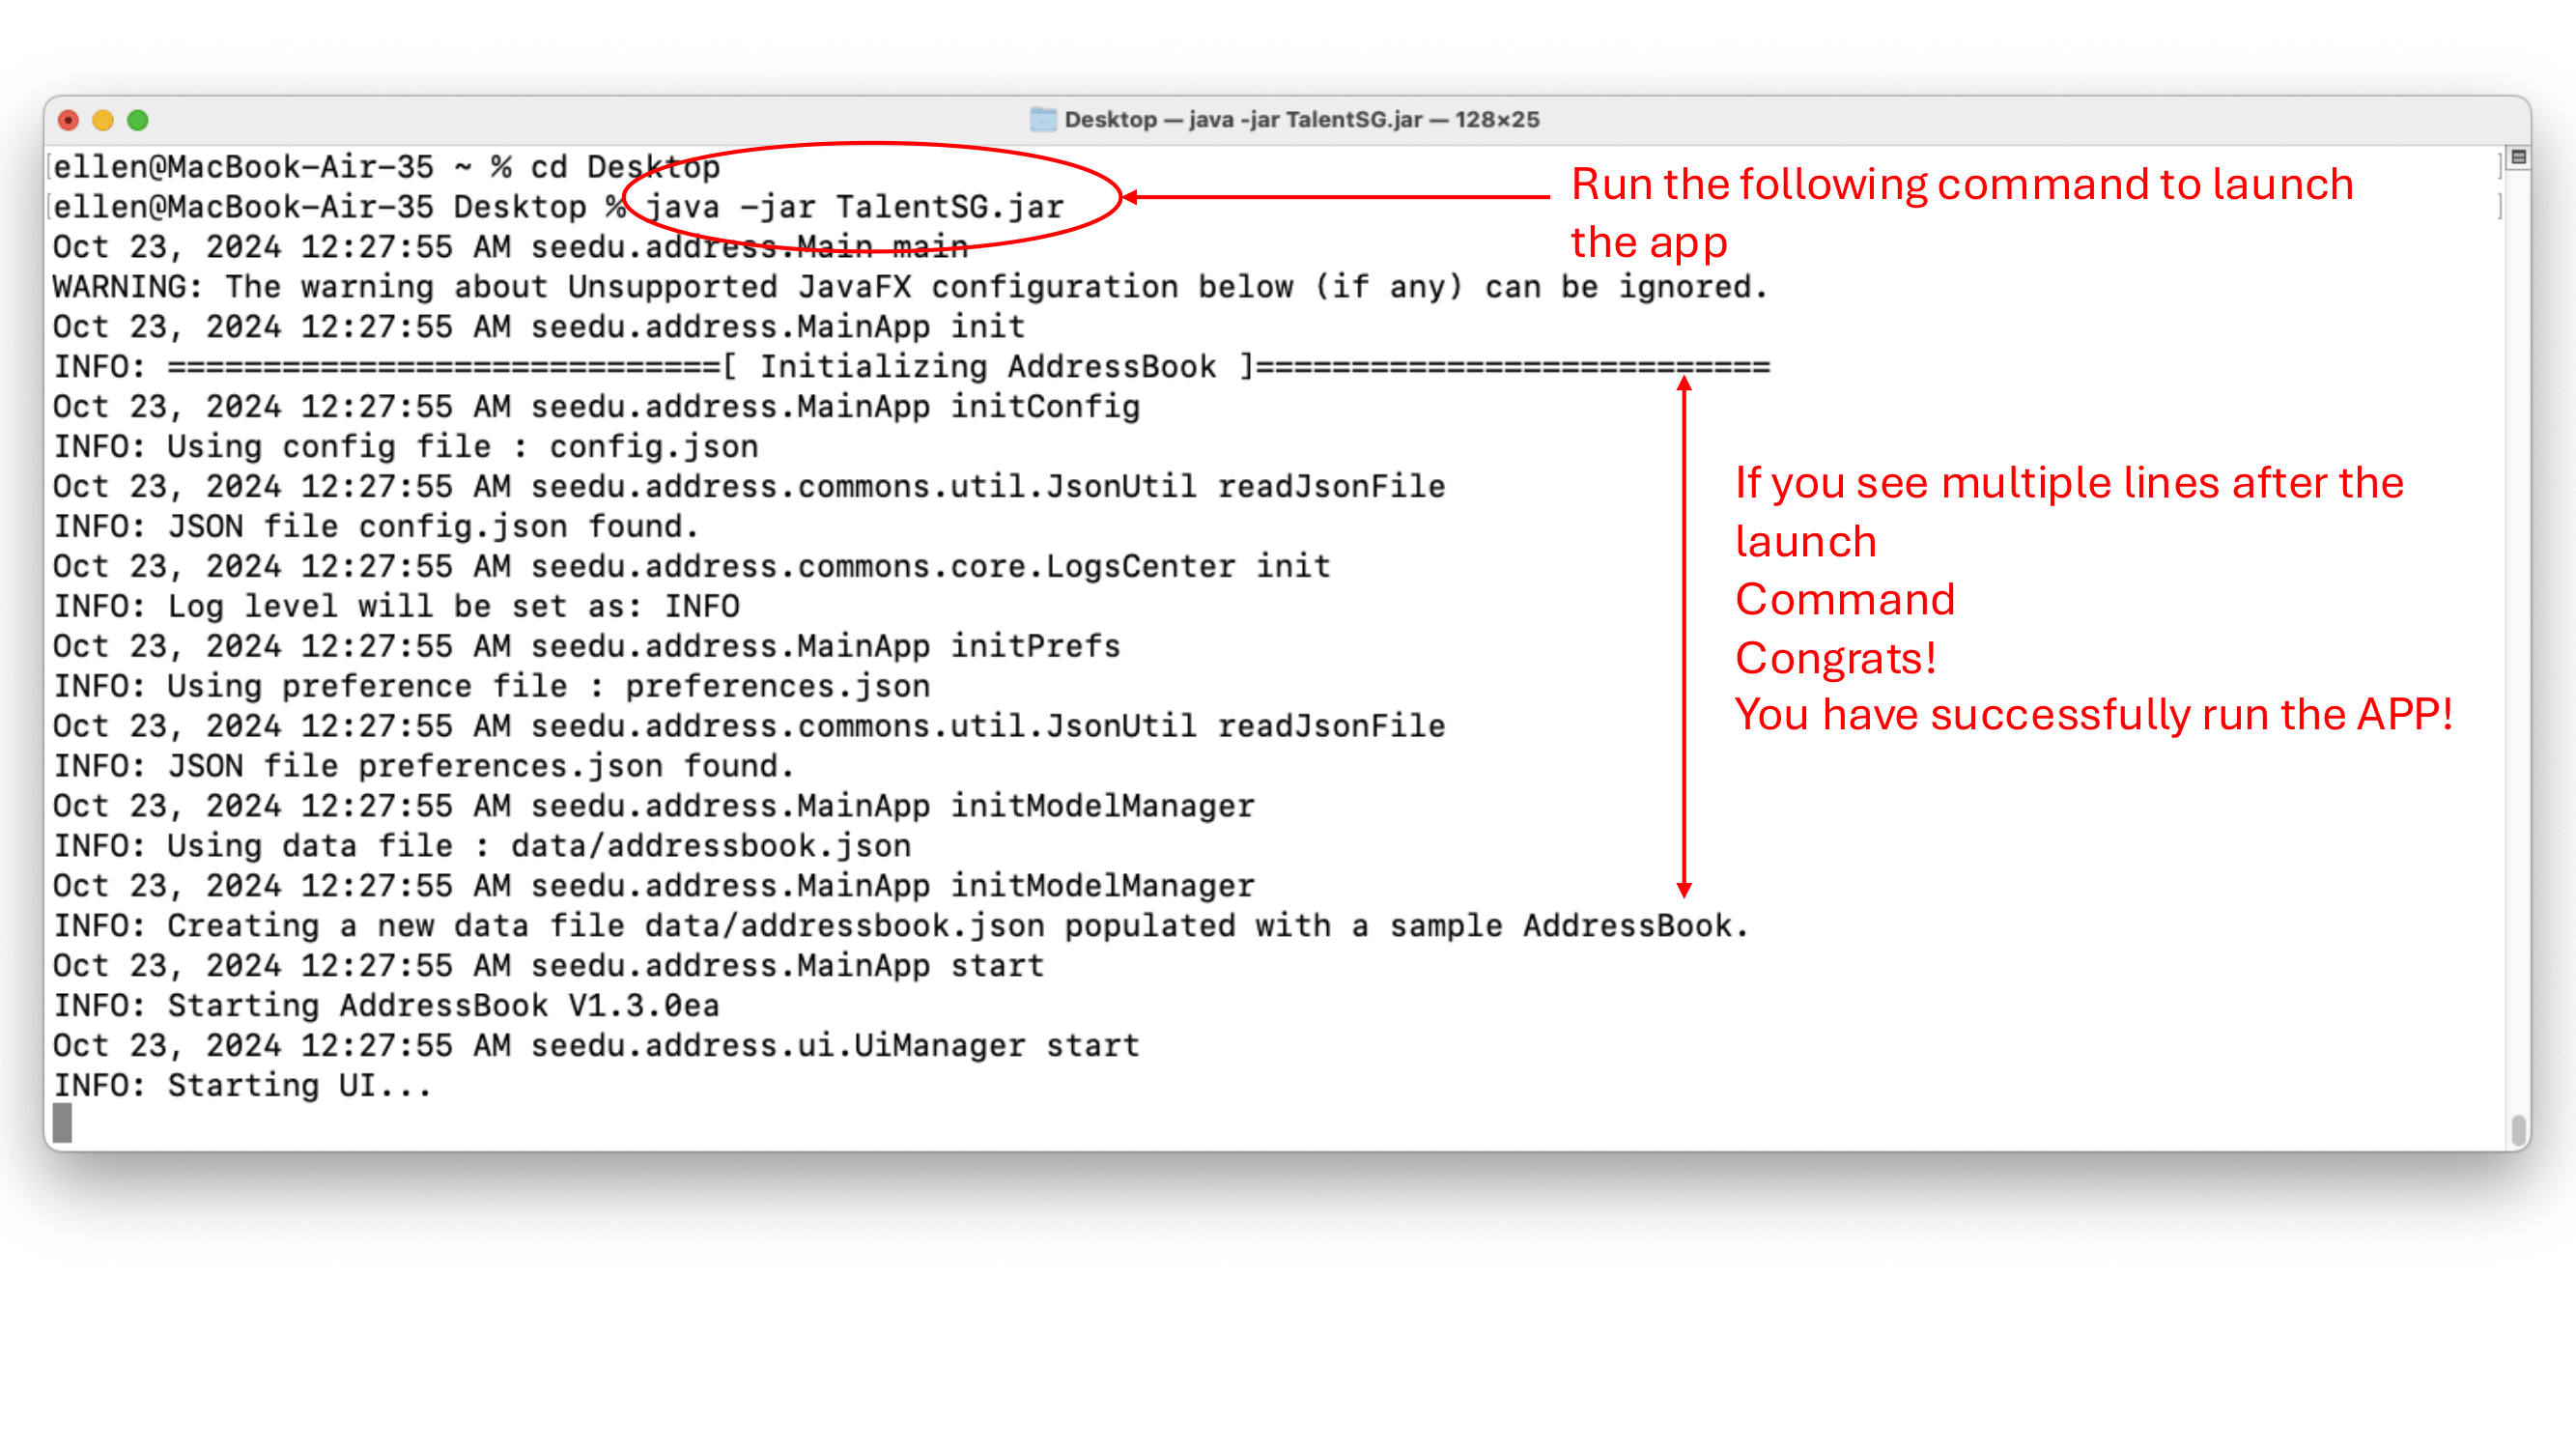 [Caution]: Ensure you’re in the correct directory before running the
 TalentSG.jarcommand. Running it in an incorrect directory will result in a “file not found” error.
- Open a command terminal.
-
🎉 A GUI similar to the one below should appear in a few seconds! 🎉
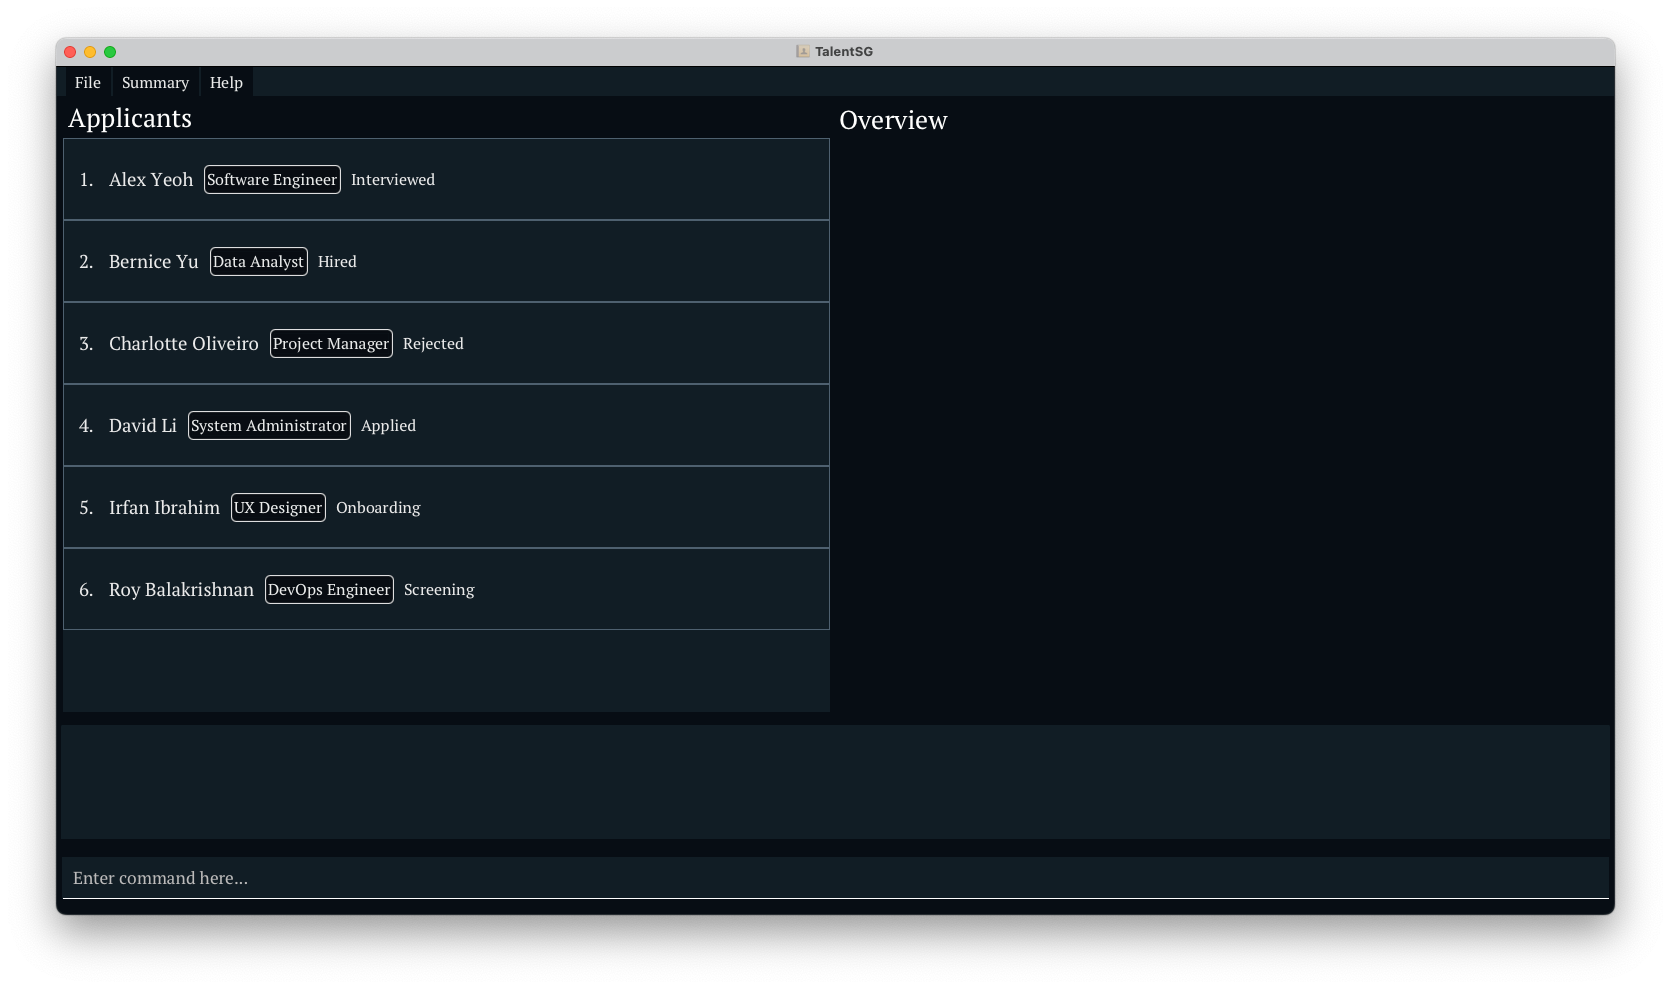
- [Note]:Note how the app contains some sample data.
- [Note]:Note how the app contains some sample data.
- Interact with TalentSG:
- Type your command into the command box and press Enter to execute it.
- For example, typing
helpand pressing Enter will display the help message.
- Try Out Example Commands:
list: Lists all Applicant.add n/John Doe p/98765432 e/johnd@example.com a/123 Main St s/Java,Python st/Applied note/Great candidate ex/5 years in HR dr/Software Engineer: Adds a Applicant namedJohn Doeto TalentSG.delete 3: Deletes the 3rd applicant shown in the current list.clear: Deletes all applicant.exit: Exits the app.
- Explore Features: Refer to the Features section for detailed information on each command.
Overview of TalentSG Graphical User Interface
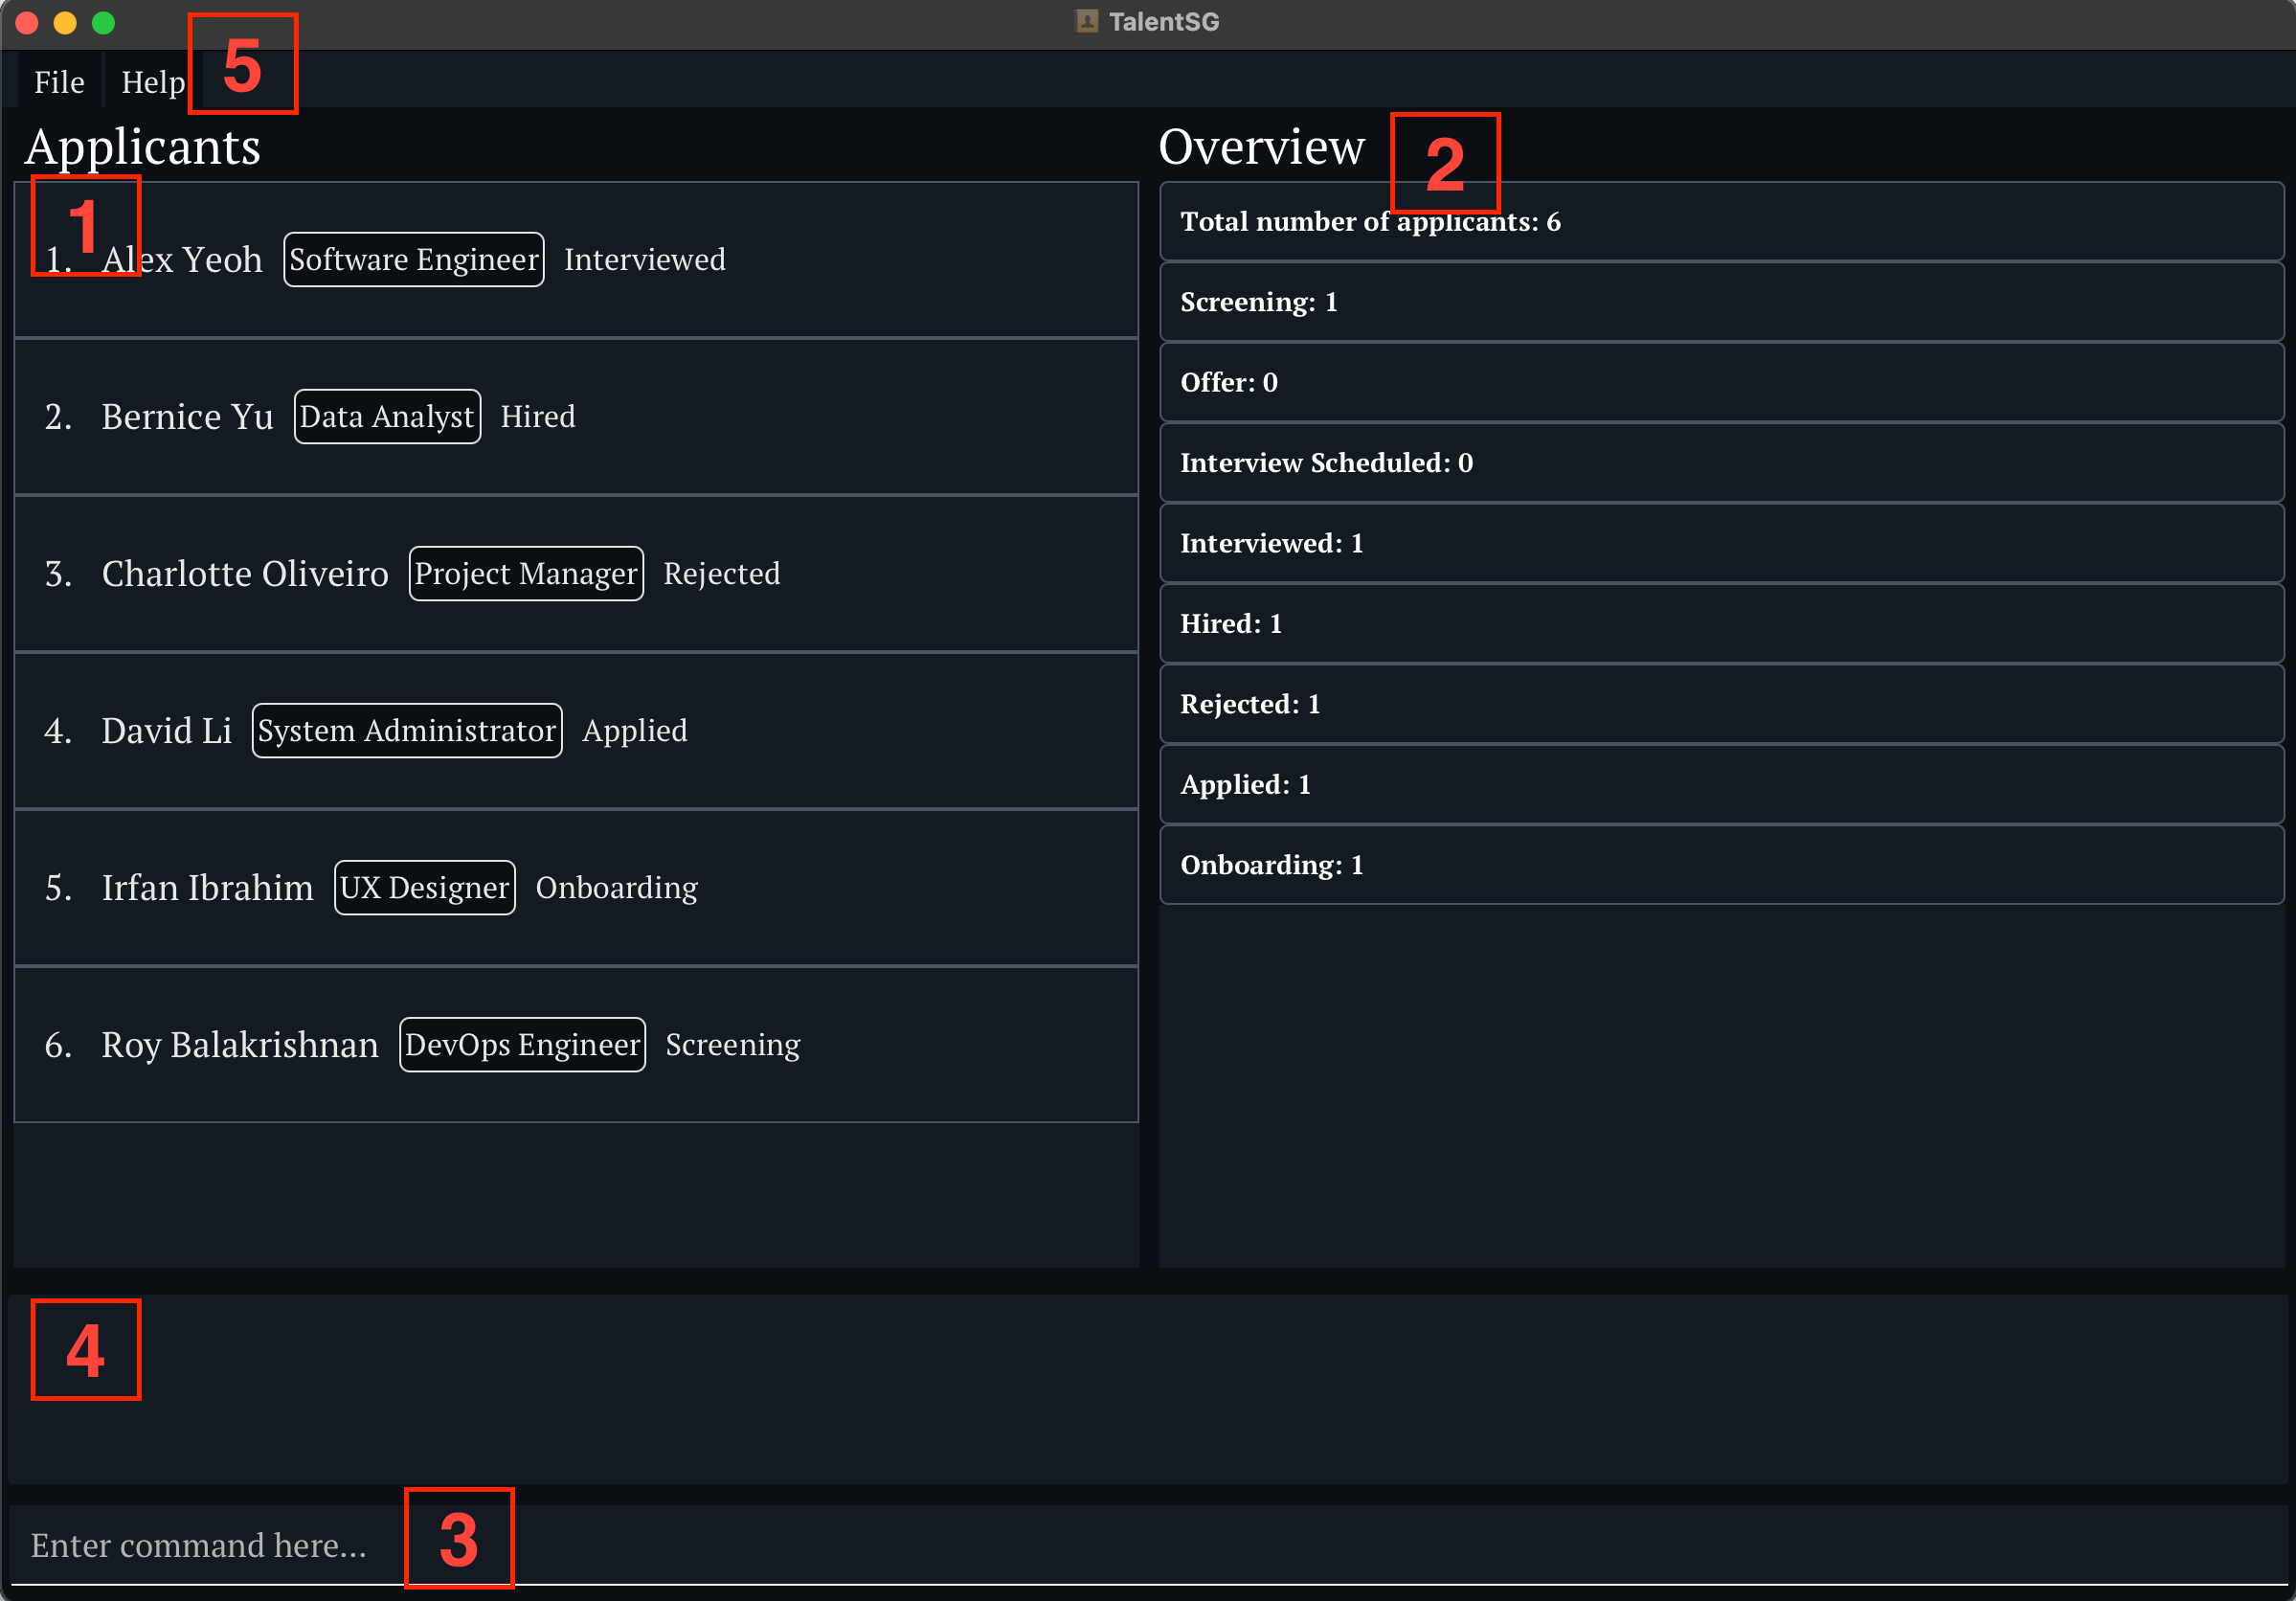
TalentSG’s UI has five main components:
-
Applicants List: Contains the list of the applicants.
-
Overview Panel: Contains details about the applicants. It can be their full detail or the summary of all the applicants.
-
Command Input Box: Enter the commands here for the input.
-
Feedback/Result Display: Shows the result of the command when executed or the feedback if there’s some error.
-
Menu Bar: It has two menus:
a. File which consists of Close and Summary.
b. Help which consists of Help and Bug Report.
[Note]: The application utilizes a fixed-size user interface to ensure a consistent and predictable layout across all devices. This approach provides precise control over design elements, maintaining the intended aesthetic and usability without the need for resizing, optimized for the target screen resolution. This design choice simplifies user interaction and reduces potential compatibility issues, supporting a streamlined and focused workflow.
Features
TalentSG provides a variety of features to help you manage candidates and job roles effectively.
Notes About the Command Format
- UPPER_CASE: Parameters to be supplied by the user.
- E.g., in
add n/NAME,NAMEcan beJohn Doe.
- E.g., in
- [Square Brackets]: Optional items.
- E.g.,
n/NAME [t/TAG]can ben/John Doe t/friendorn/John Doe.
- E.g.,
- Ellipsis (…): Items that can be used multiple times, including zero times.
- E.g.,
[t/TAG]...can bet/friend,t/friend t/family, or omitted entirely.
- E.g.,
- Parameters Order: Parameters can be in any order.
- E.g.,
n/NAME p/PHONE_NUMBERis the same asp/PHONE_NUMBER n/NAME.
- E.g.,
- Extraneous Parameters: Ignored for commands that do not take parameters such as
Summary,List,Help,Clear&Exit.- E.g.,
help 123is interpreted ashelp.
- E.g.,
- Copying Commands: Be cautious when copying multi-line commands from PDFs; line breaks may affect the command execution.
Constraints of fields
| Field | Constraints | Example |
|---|---|---|
| NAME | Any number of alphanumeric characters and spaces, no special characters | Dominic, Stanley, Adi |
| PHONE_NUMBER | Numeric characters (0-9) only. Does not support spaces, country codes, or other symbols | 98989899, 81092819 |
| Valid email format | testing@gmail.com,example@gmail.com |
|
| ADDRESS | Valid address, should not be blank | Bukit Panjang Ring Rd, Ringer 9 St |
| SKILLS | Non-empty string consisting of alphabetic characters separated by commas. Spacings, ‘#’ and ‘:’ are accepted. Must be between 1 and 41 characters long. | Java, Python (, included), C++ , Machine Learning |
| STATUS | Only accepts these 9 Pre-defined statuses | Applied, Screening, Interview Scheduled, Interviewed, Offer, Onboarding, Hired, Rejected |
| EXPERIENCE | Should not be blank. | Student @ NUS, SWE of 5 years @ Google SG |
| DESIRED_ROLE | Should not be blank. | Software Engineer, UI/UX Designer, Administrator |
| NOTE | Any character are accepted | Very confident, Confident |
| Tags | Alphanumeric characters. Cannot include spaces or special characters. Each tag should be a single, continuous word. Can have multiple tags | Amazing, MustHave |
-
[Note]: The Name field:
1. Accepts a large number of characters (over 50), but excessively long names may be truncated in the display for better readability.
2. Accepts numerical values. There are laws around the world which allow people to have numerical values as names. You can read more about this from this article.
3. Does not accept special characters (e.g.,/,-). This restriction may pose limitations for certain names, such ass/oor hyphenated names. A workaround is to use spaces or omit these characters (e.g., enterJohn s o Kaarthikinstead ofJohn s/o Kaarthik). -
[Note]: The Note field is recommended to be within 200 characters for optimal performance and display. Exceeding this length may result in truncated display or other limitations in certain views.
General Note: The fields in TalentSG only support alphanumeric characters, spaces, and a few select symbols like
#and:in specific cases. If a field requires a symbol that is unsupported (e.g.,/,-,@), you may consider using an alternative format or omitting the symbol entirely. For example:
- Use
Objective Cinstead ofObjective-C.- Use
John s o Kaarthikinstead ofJohn s/o Kaarthik.- Use
Apartment No 3instead ofApartment #3.
-
[Caution]: Extremely long names may be truncated in both the Applicants list and Overview Panel due to space constraints. If you need to view the full name, you may access the data file directly. To ensure readability, it is recommended to keep names within a reasonable length.
-
[Caution]: The required information except tags cannot be empty.
Viewing Help: help
Format: help

Shows a message explaining how to access the help page.
Adding a Person: add
Adds a new candidate to TalentSG.
Format: add n/NAME p/PHONE_NUMBER e/EMAIL a/ADDRESS dr/DESIRED_ROLE s/SKILLS ex/EXPERIENCE st/STATUS note/NOTE [t/TAG]...
Example
add n/John Doe p/98765432 e/johnd@example.com a/311, Clementi Ave 2, #02-25 dr/Software Engineer s/Java, Python, C++ ex/Project Manager at Google from 2010-2020 st/Interviewed note/Super confident t/friends t/owesMoney
Image Example
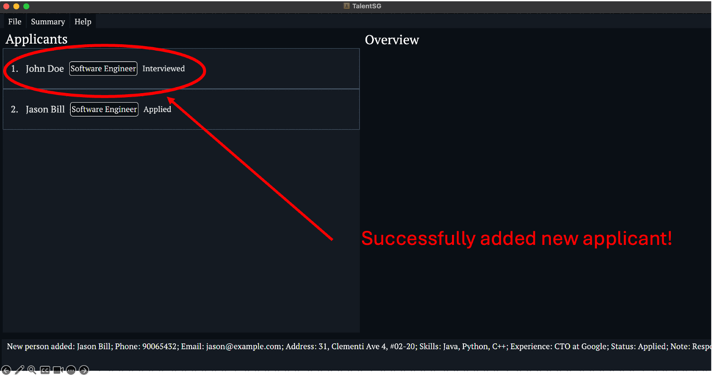
Command: add n/Jason Bill p/90065432 e/jason@example.com a/31, Clementi Ave 4, #02-20 dr/Software Engineer s/Java, Python, C++ ex/CTO at Google st/Applied note/Responsible t/friends
After the add command ran:
[Caution]: You cannot add the same candidate twice. (same name and phone)
[Tip]: The parameters in the add command can be entered in any order. For example, p/PHONE_NUMBER n/NAME e/EMAIL is equivalent to n/NAME p/PHONE_NUMBER e/EMAIL. This flexibility allows you to add candidates without needing to remember a strict parameter sequence, making data entry faster and more user-friendly.
Listing All Persons: list
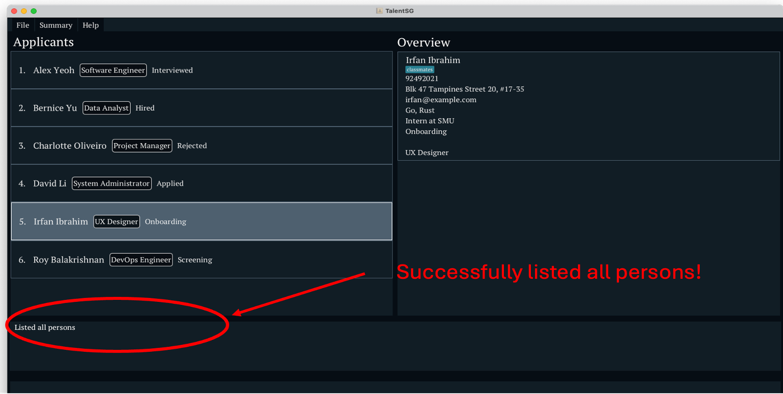
Shows a list of all applicants in TalentSG.
Format: list
Image Example
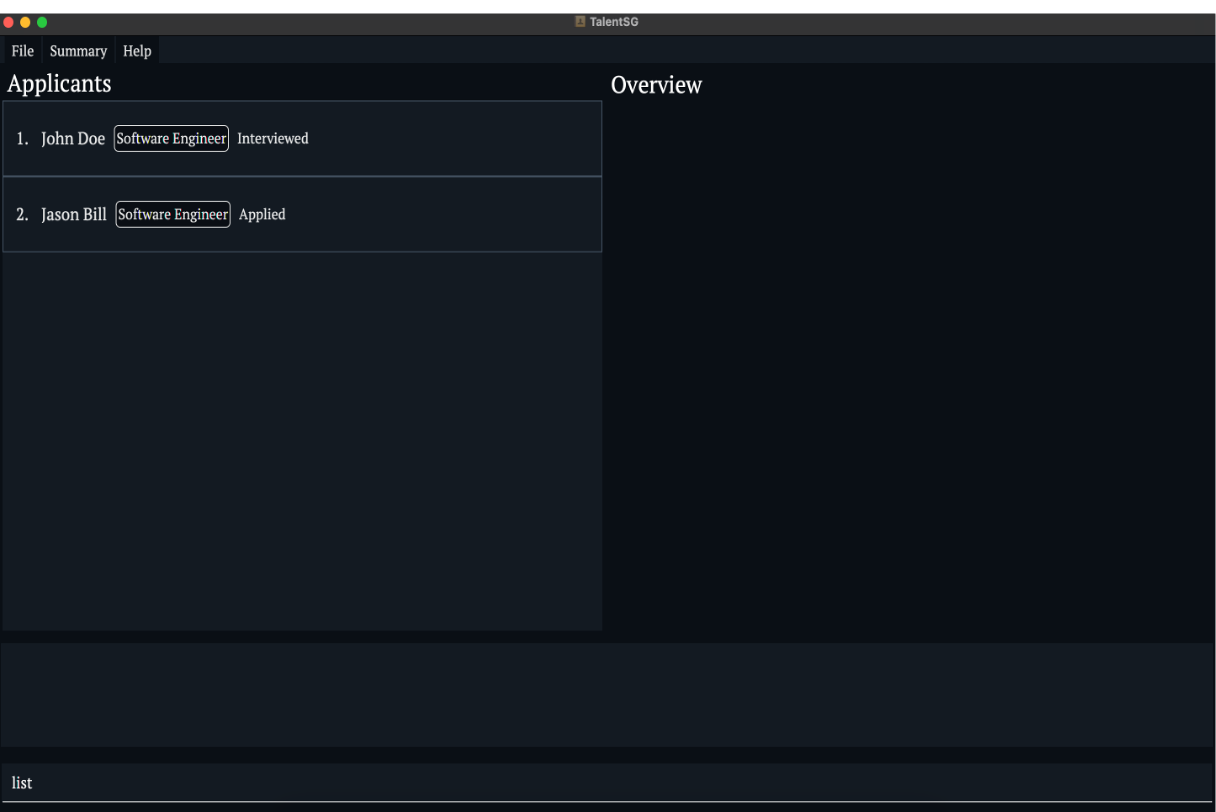
Command: ` list `
Before the list command ran:
After the list command ran:
[Tip]: Regularly listing all Applicants helps you review the information stored and identify any duplicates or mistakes early.
Editing a Person: edit
Edits an existing person in the address book.
Format: edit INDEX [n/NAME] [p/PHONE] [e/EMAIL] [a/ADDRESS] [s/SKILLS] [st/STATUS] [note/NOTE] [ex/EXPERIENCE] [dr/DESIRED_ROLE] [t/TAG]...
Constraints
- INDEX: Must be a positive integer corresponding to the candidate’s position in the list.
- At Least One Field: Must be provided.
- Existing Values: Will be replaced with new inputs.
Example
edit 1 p/91234567 e/johndoe@example.com: Updates phone and email of the first candidate.edit 2 n/Betsy Crower t/: Changes the name and clears all tags of the second candidate.
Image Example
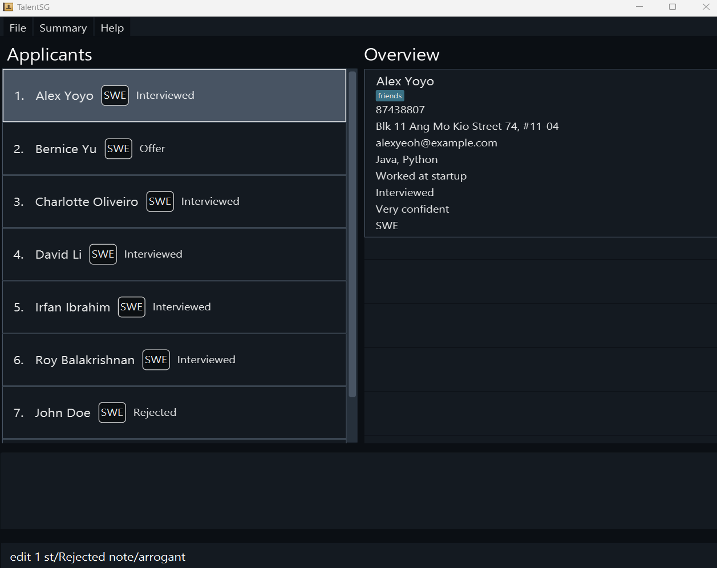
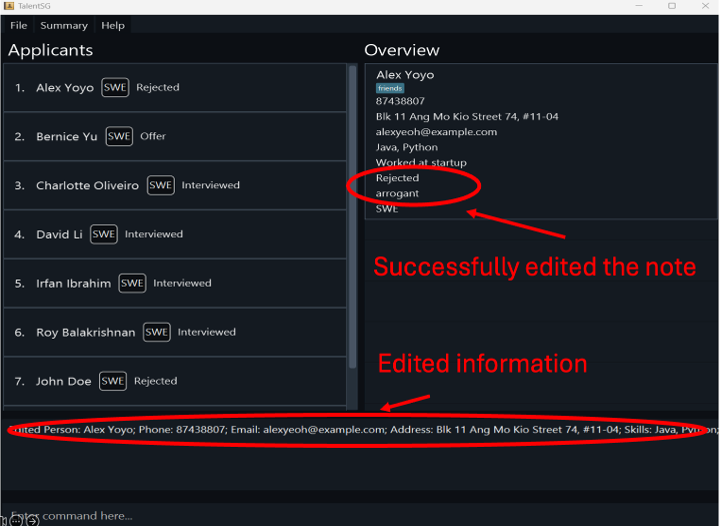
Command: ` edit 1 st/Rejected note/arrogant `
Before the edit command ran:
After the edit command ran:
[Caution]: You cannot edit a candidate to be a duplicate of another existing candidate. (same name and same phone)
[Note]: When using the edit command to modify tags, all existing tags for that person will be replaced by the new tags provided. To retain previous tags and add new ones, retype all desired tags in the edit command.
Finding Persons by Name: find
Finds persons whose names contain any of the given keywords.
Format: find KEYWORD [MORE_KEYWORDS]
- The search is case-insensitive. e.g
hanswill matchHans - The order of the keywords does not matter. e.g.
Hans Bowill matchBo Hans - Only the name is searched.
- Only full words will be matched e.g.
Hanwill not matchHans - Persons matching at least one keyword will be returned (i.e.
ORsearch). e.g.Hans Bowill returnHans Gruber,Bo Yang
Example
find JohnreturnsjohnandJohn Doefind alex davidreturnsAlex Yeoh,David Li
[Caution]: If you search for “Han,” Applicants named “Hans” will not appear in the results. Always search by full words.
Image Example
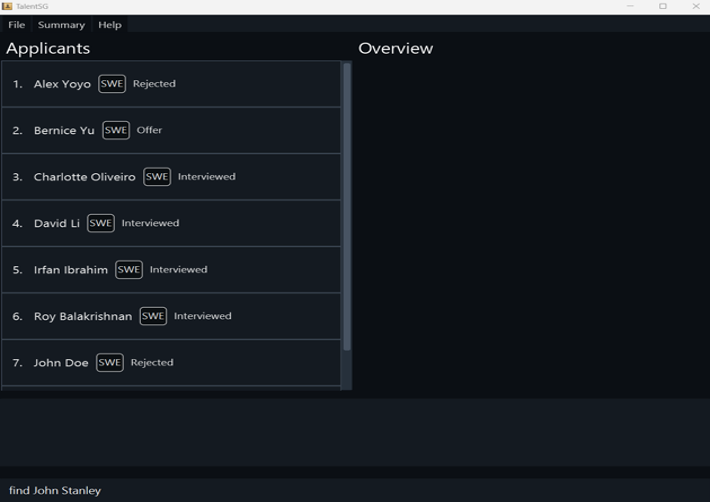
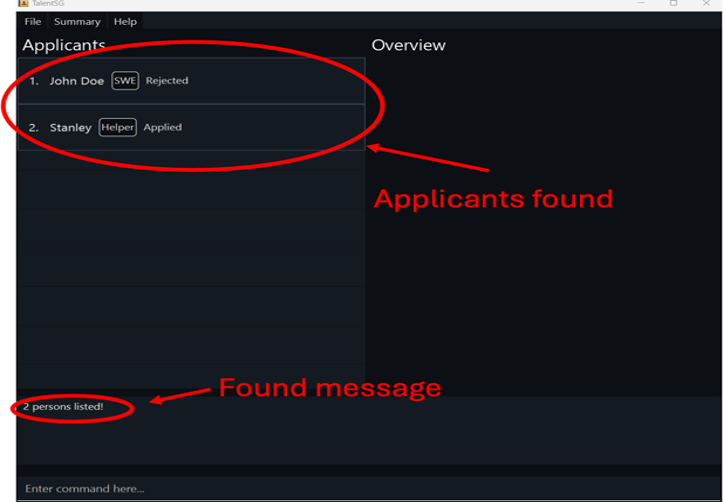
Command: ` find John Stanley `
Before the find command ran:
After the find command ran:
Deleting a Person: delete
Removes a candidate from TalentSG.
Format: delete INDEX
Constraints
- INDEX: Refers to the candidate’s number in the current list.
- Positive Integer: Must be 1, 2, 3, etc.
Example
listfollowed bydelete 2: Deletes the second candidate.find Betsyfollowed bydelete 1: Deletes the first candidate in the search results.
Image Example
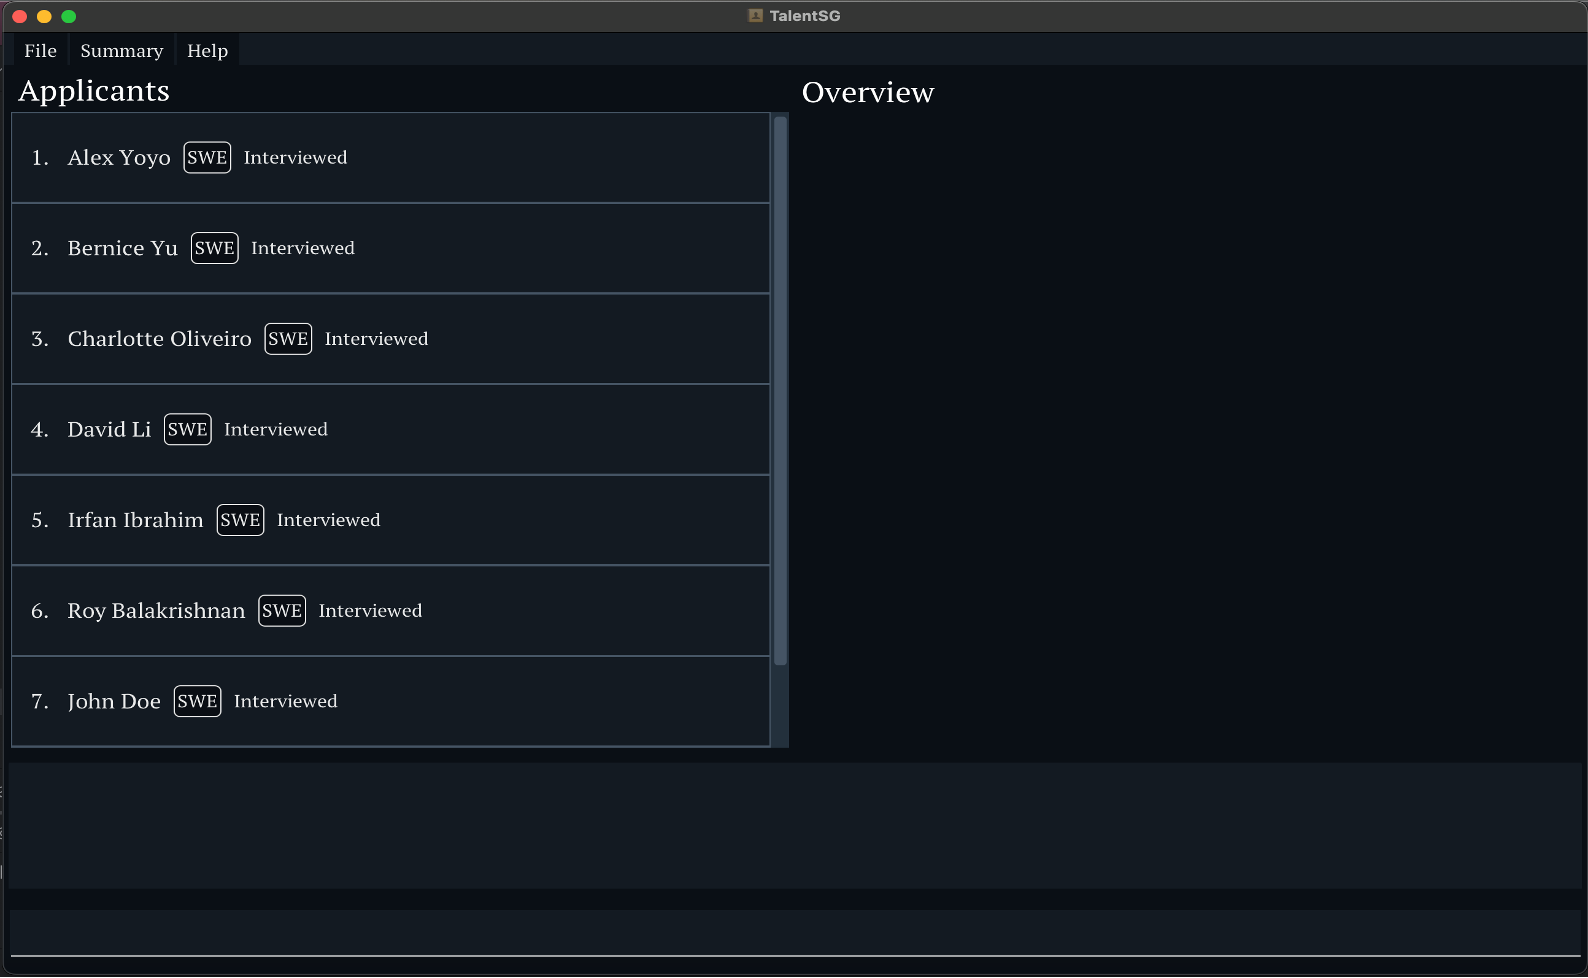
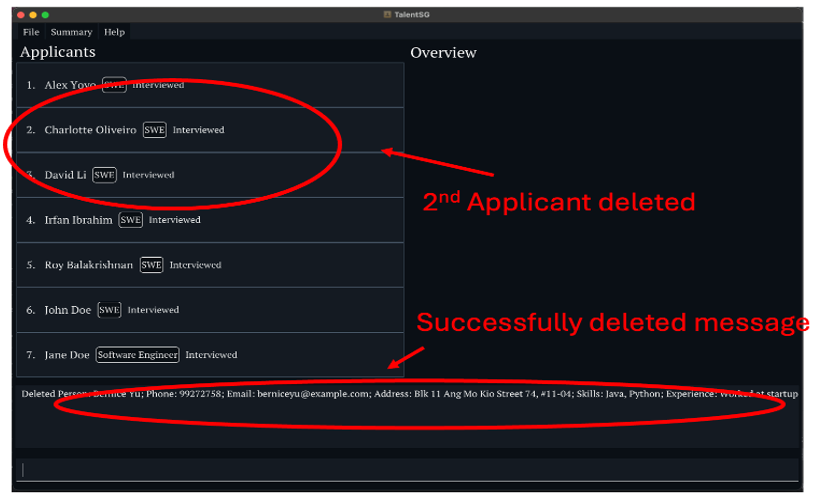
Command: ` delete 2 `
Before the delete command ran:
After the delete command ran:
[Caution]: Deleted entries cannot be recovered.
Viewing Applicant Details: view
Displays the details of a specific applicant in the list. This command allows you to quickly view all relevant information of an applicant by specifying their index in the list.
Format: view INDEX
Constraints
- INDEX: Must be a positive integer corresponding to the applicant’s position in the current list.
Example
view 2: Displays the details of the second applicant in the list.listfollowed byview 1: Lists all applicants, then shows details of the first applicant.
Image Example
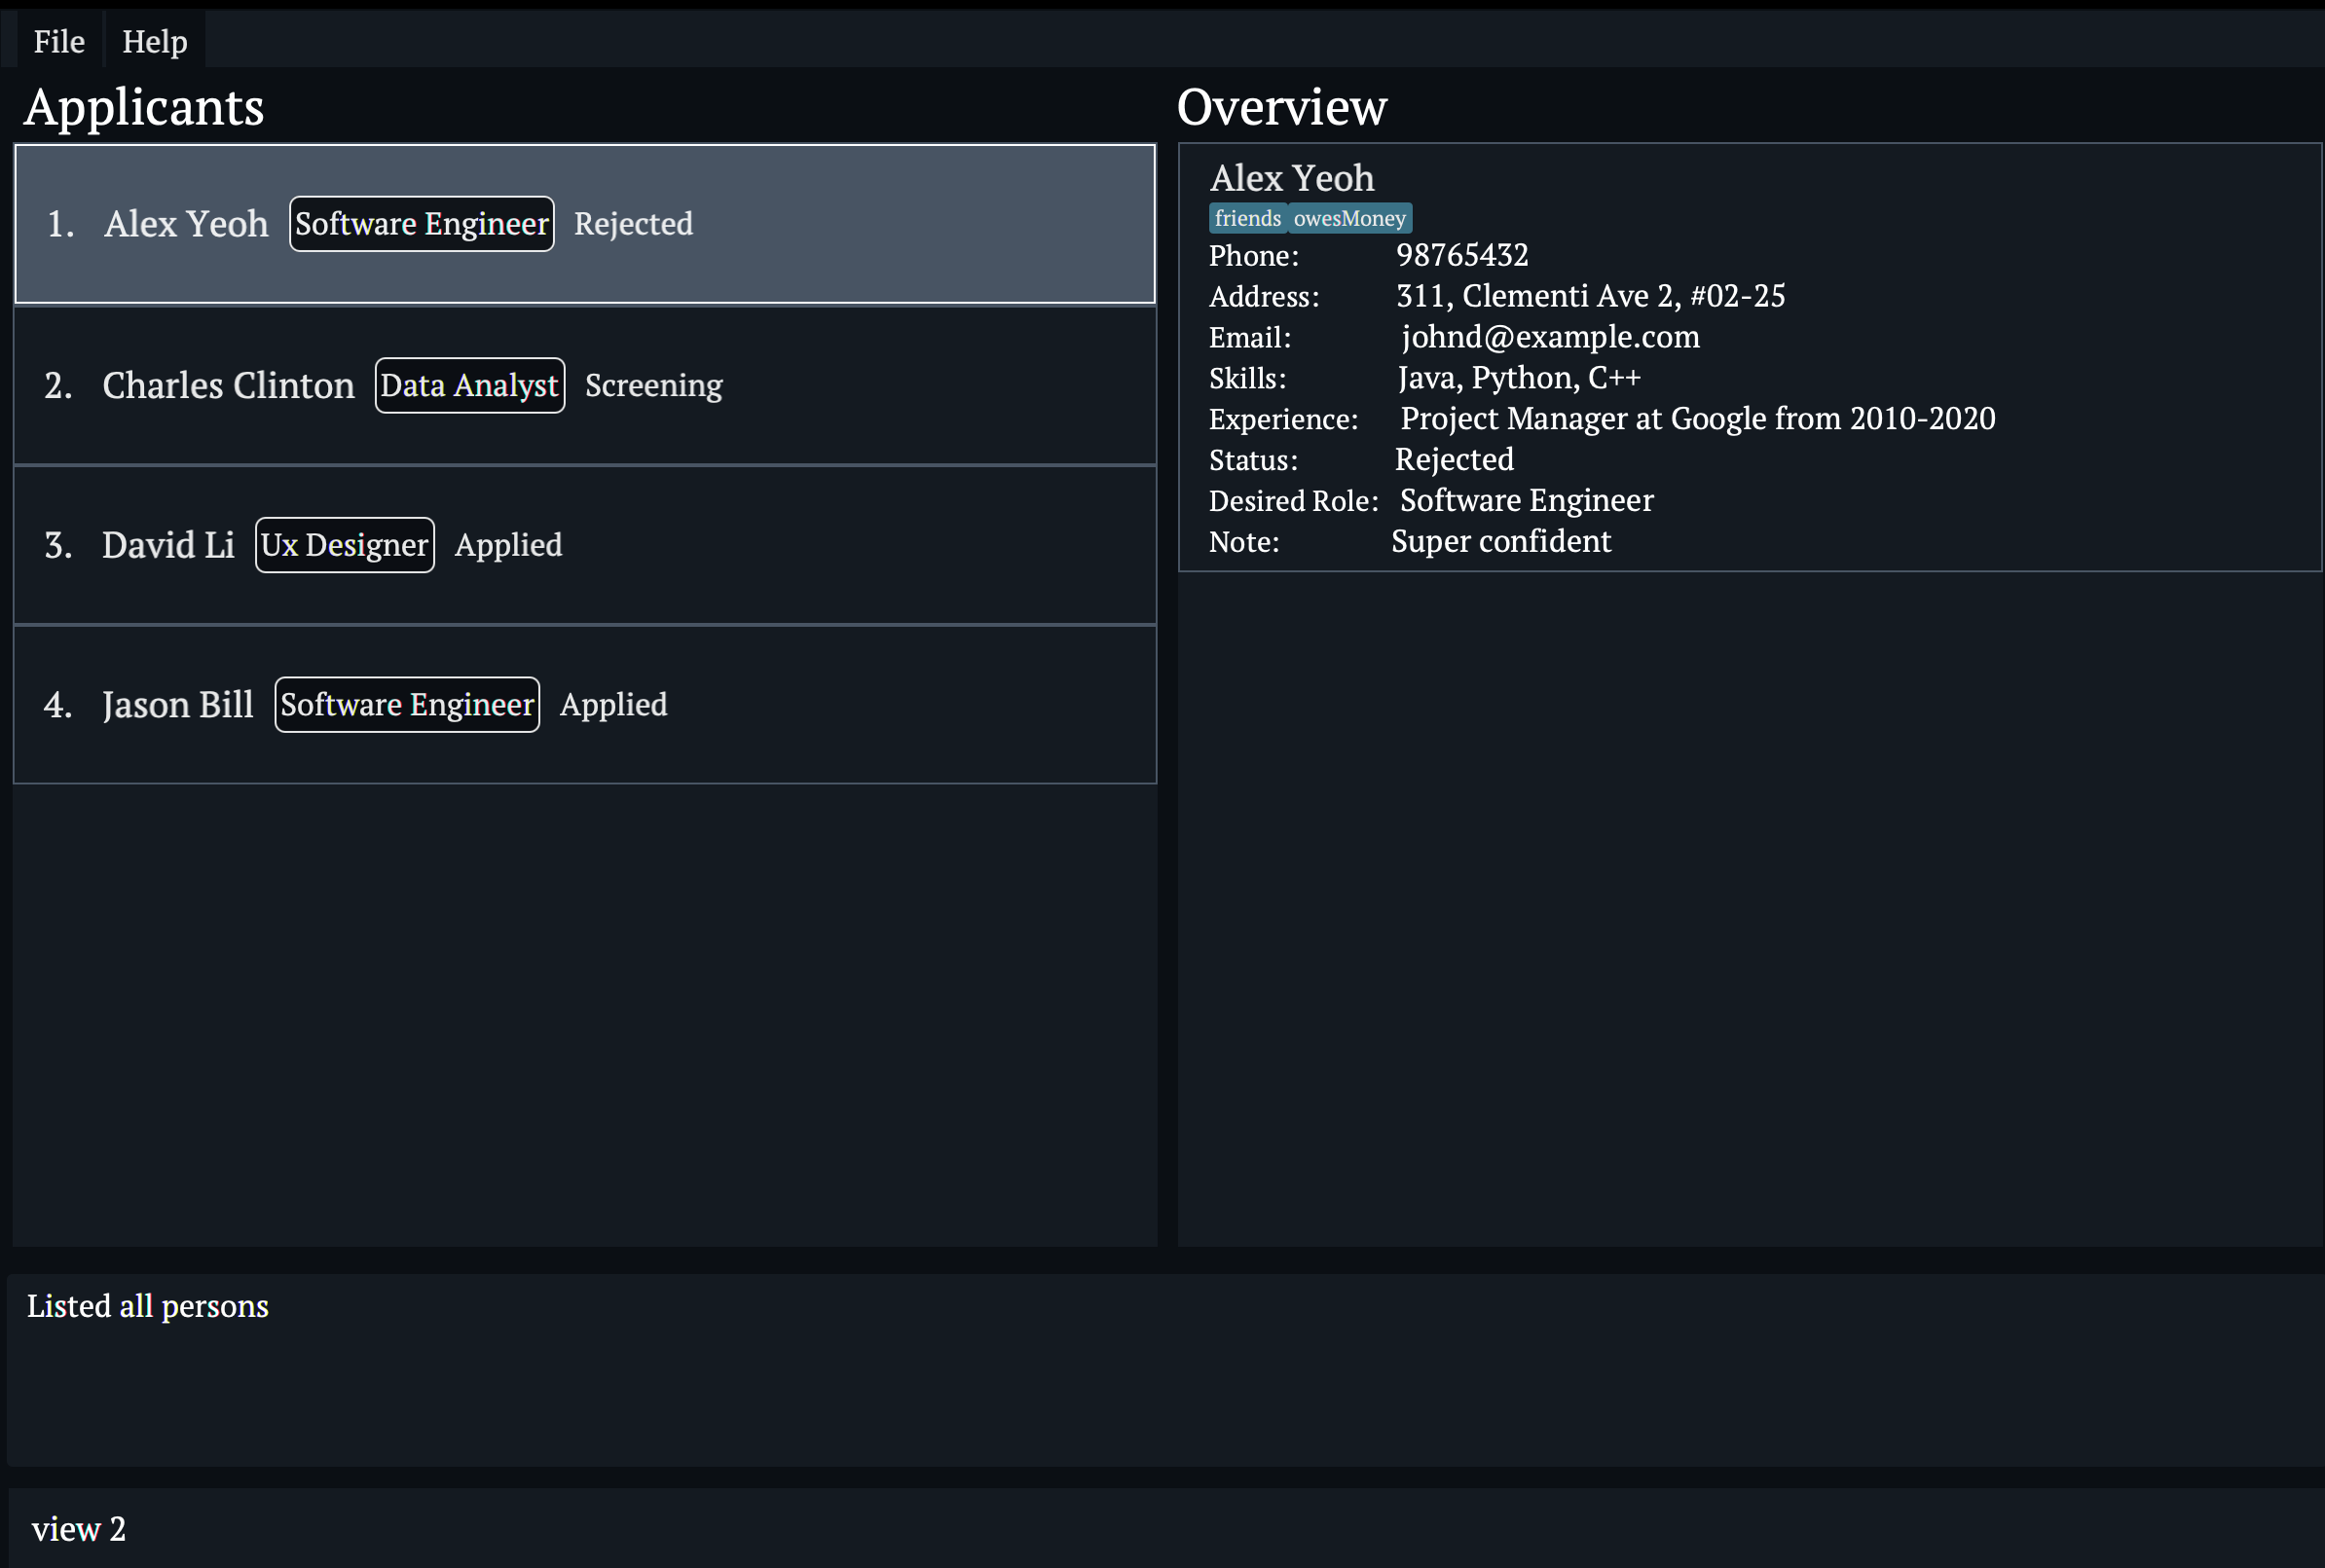
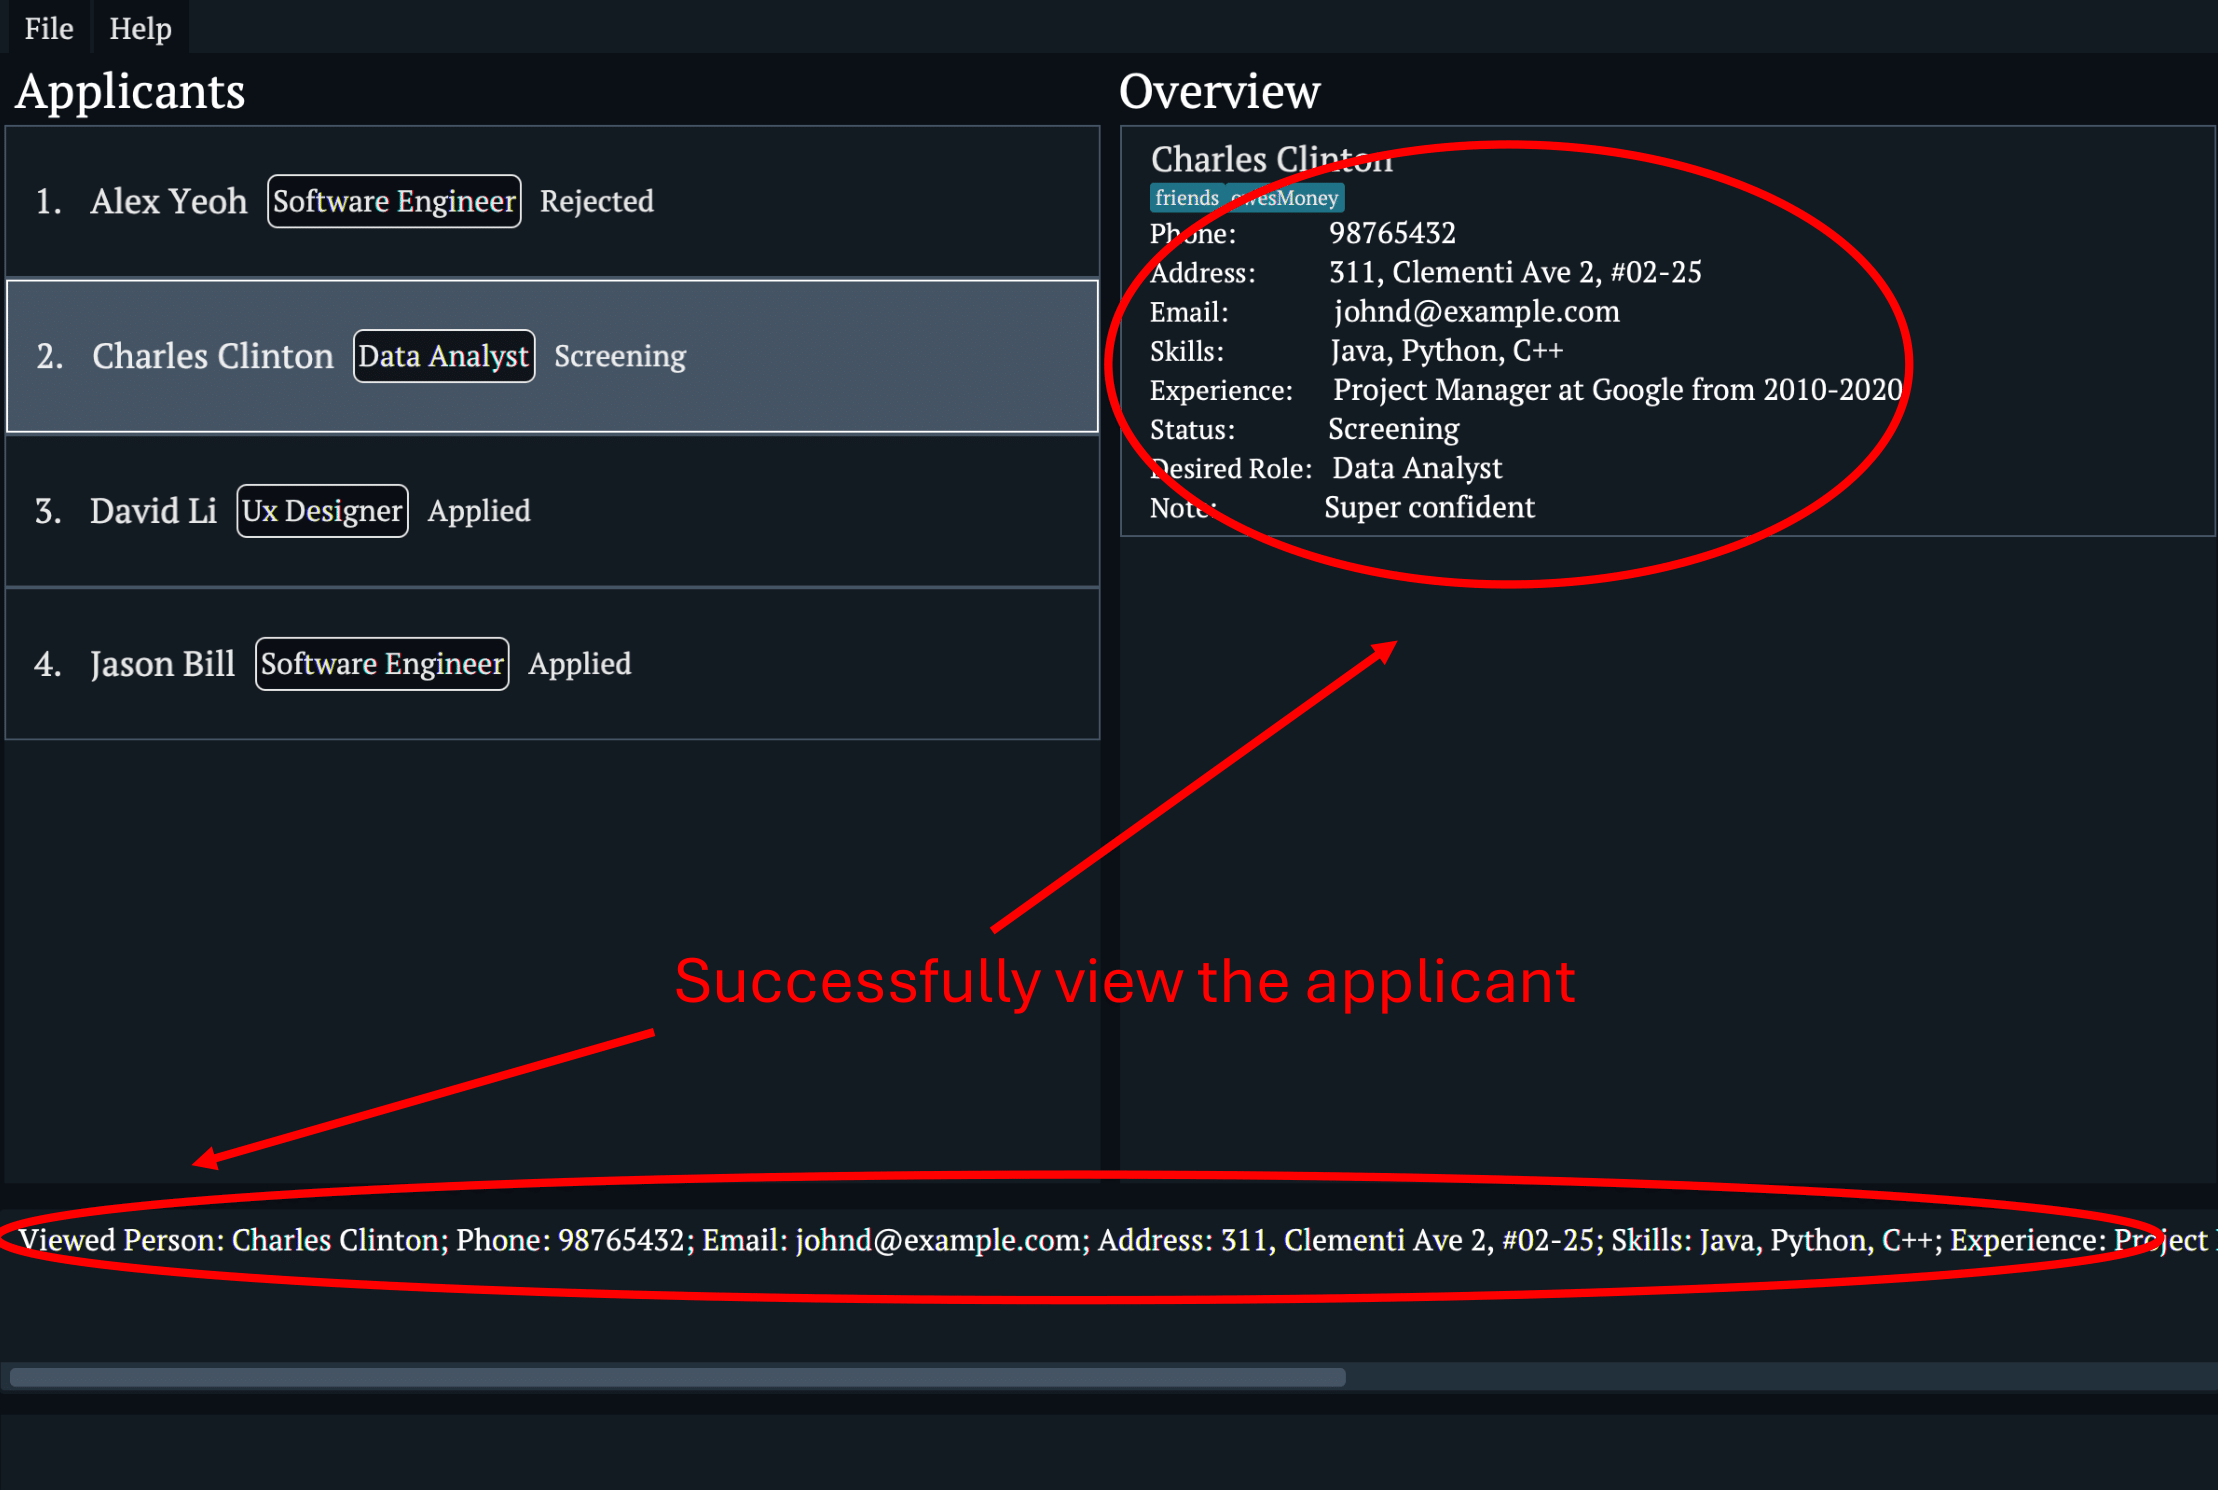
Command: view 2
Before the view command is run:
After the view command is run:
View Output Example:
When using the view command, the applicant’s details will appear in the right panel, displaying information such as:
- Name
- Phone Number
- Address
- Skills
- Experience
- Status
- Desired Role
- Note
- Tags
This allows you to conveniently access all the specific details about an applicant in one view.
[Tip]: Use the view command frequently to ensure you have the most updated and detailed information about each applicant during your recruitment process.
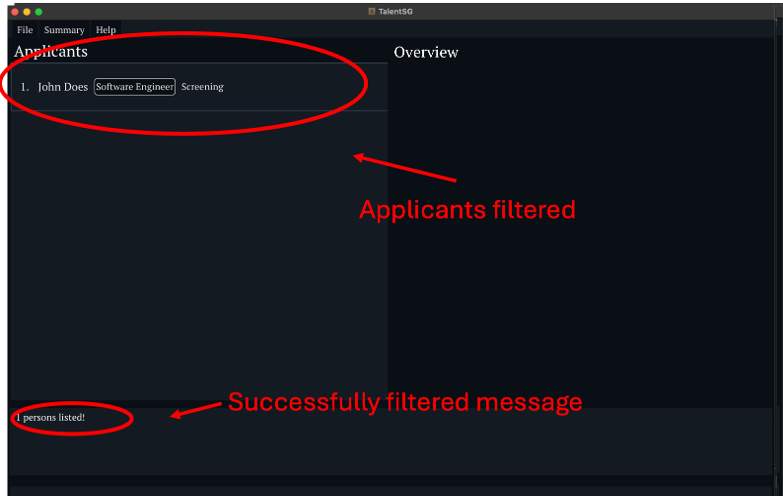
Filtering Applicants by Status: filter
Filters candidates based on their status.
Format: filter STATUS
Notes
- Case-Sensitive: The search is case-sensitive.
- Available Statuses:
- Applied
- Screening
- Interview Scheduled
- Interviewed
- Offer
- Onboarding
- Hired
- Rejected
Examples
filter Applied: Displays all candidates marked as “Applied”.filter Interviewed: Shows candidates marked as “Interviewed”.
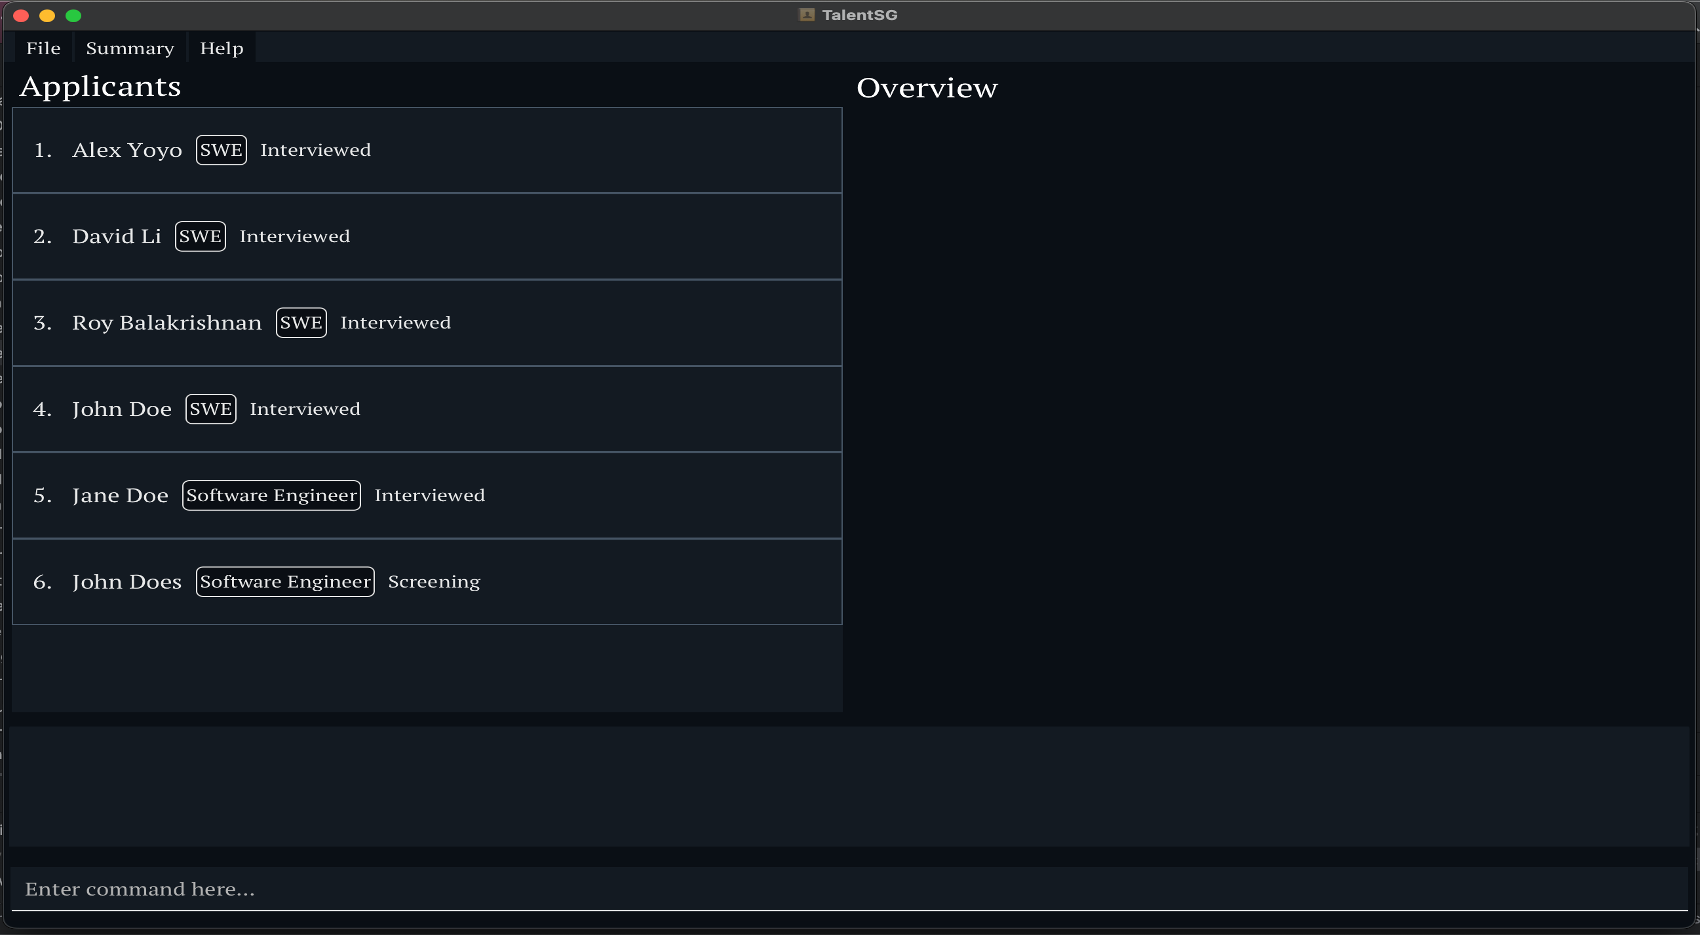
Image Example
Command: filter Screening
Before the filter command ran:
After the filter command ran:
Invalid Status
If an invalid status is input (e.g., filter applying), an error message will appear:
Invalid status: applying. Valid statuses are: Applied, Screening, Interview Scheduled, Interviewed, Offer, Onboarding, Hired, Rejected
[Caution]: The filter command is case-sensitive. Make sure to enter the status exactly as shown below, with correct capitalization.
Summary: summary
Provides a quick overview of the current applicants’ status, giving you a breakdown of the number of applicants in each stage of the recruitment process. This feature is useful for quickly assessing the progress of your recruitment pipeline.
Format: summary
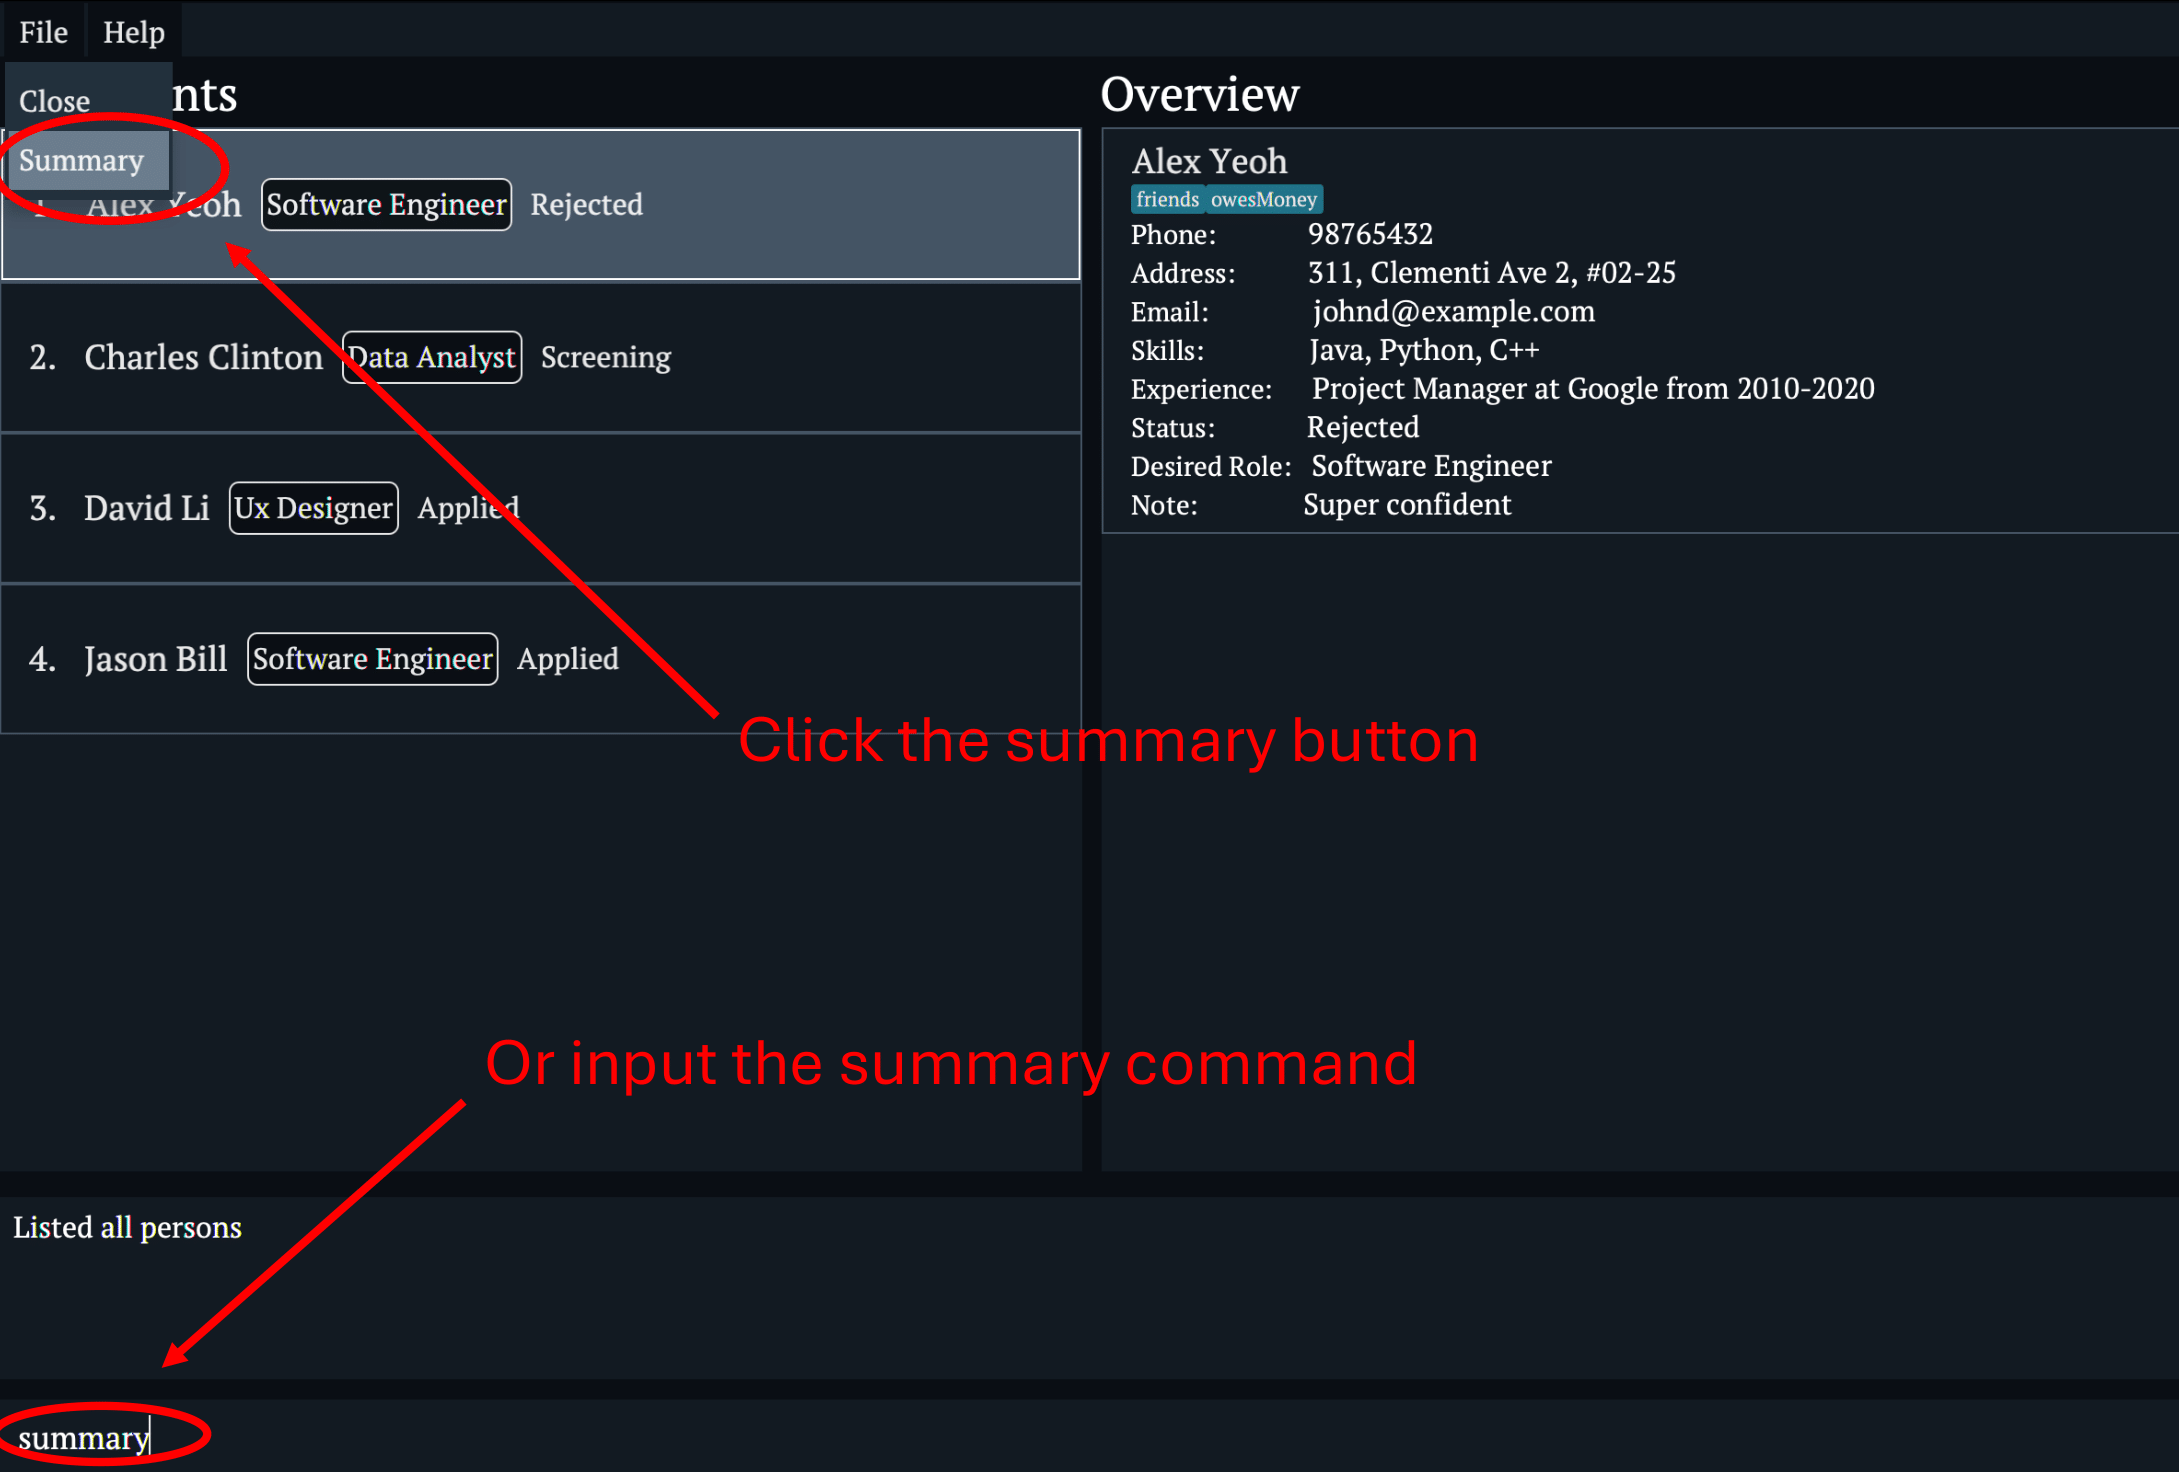
- The summary command can be activated by typing
summaryin the command line or by clicking the Summary option in the File menu.
Example
- Using the Command Line
- Simply type
summaryand press Enter.
- Simply type
- Using the File Menu
- Go to the File menu and select Summary.
Image Example
Before the summary command is run:
After the summary command is run:
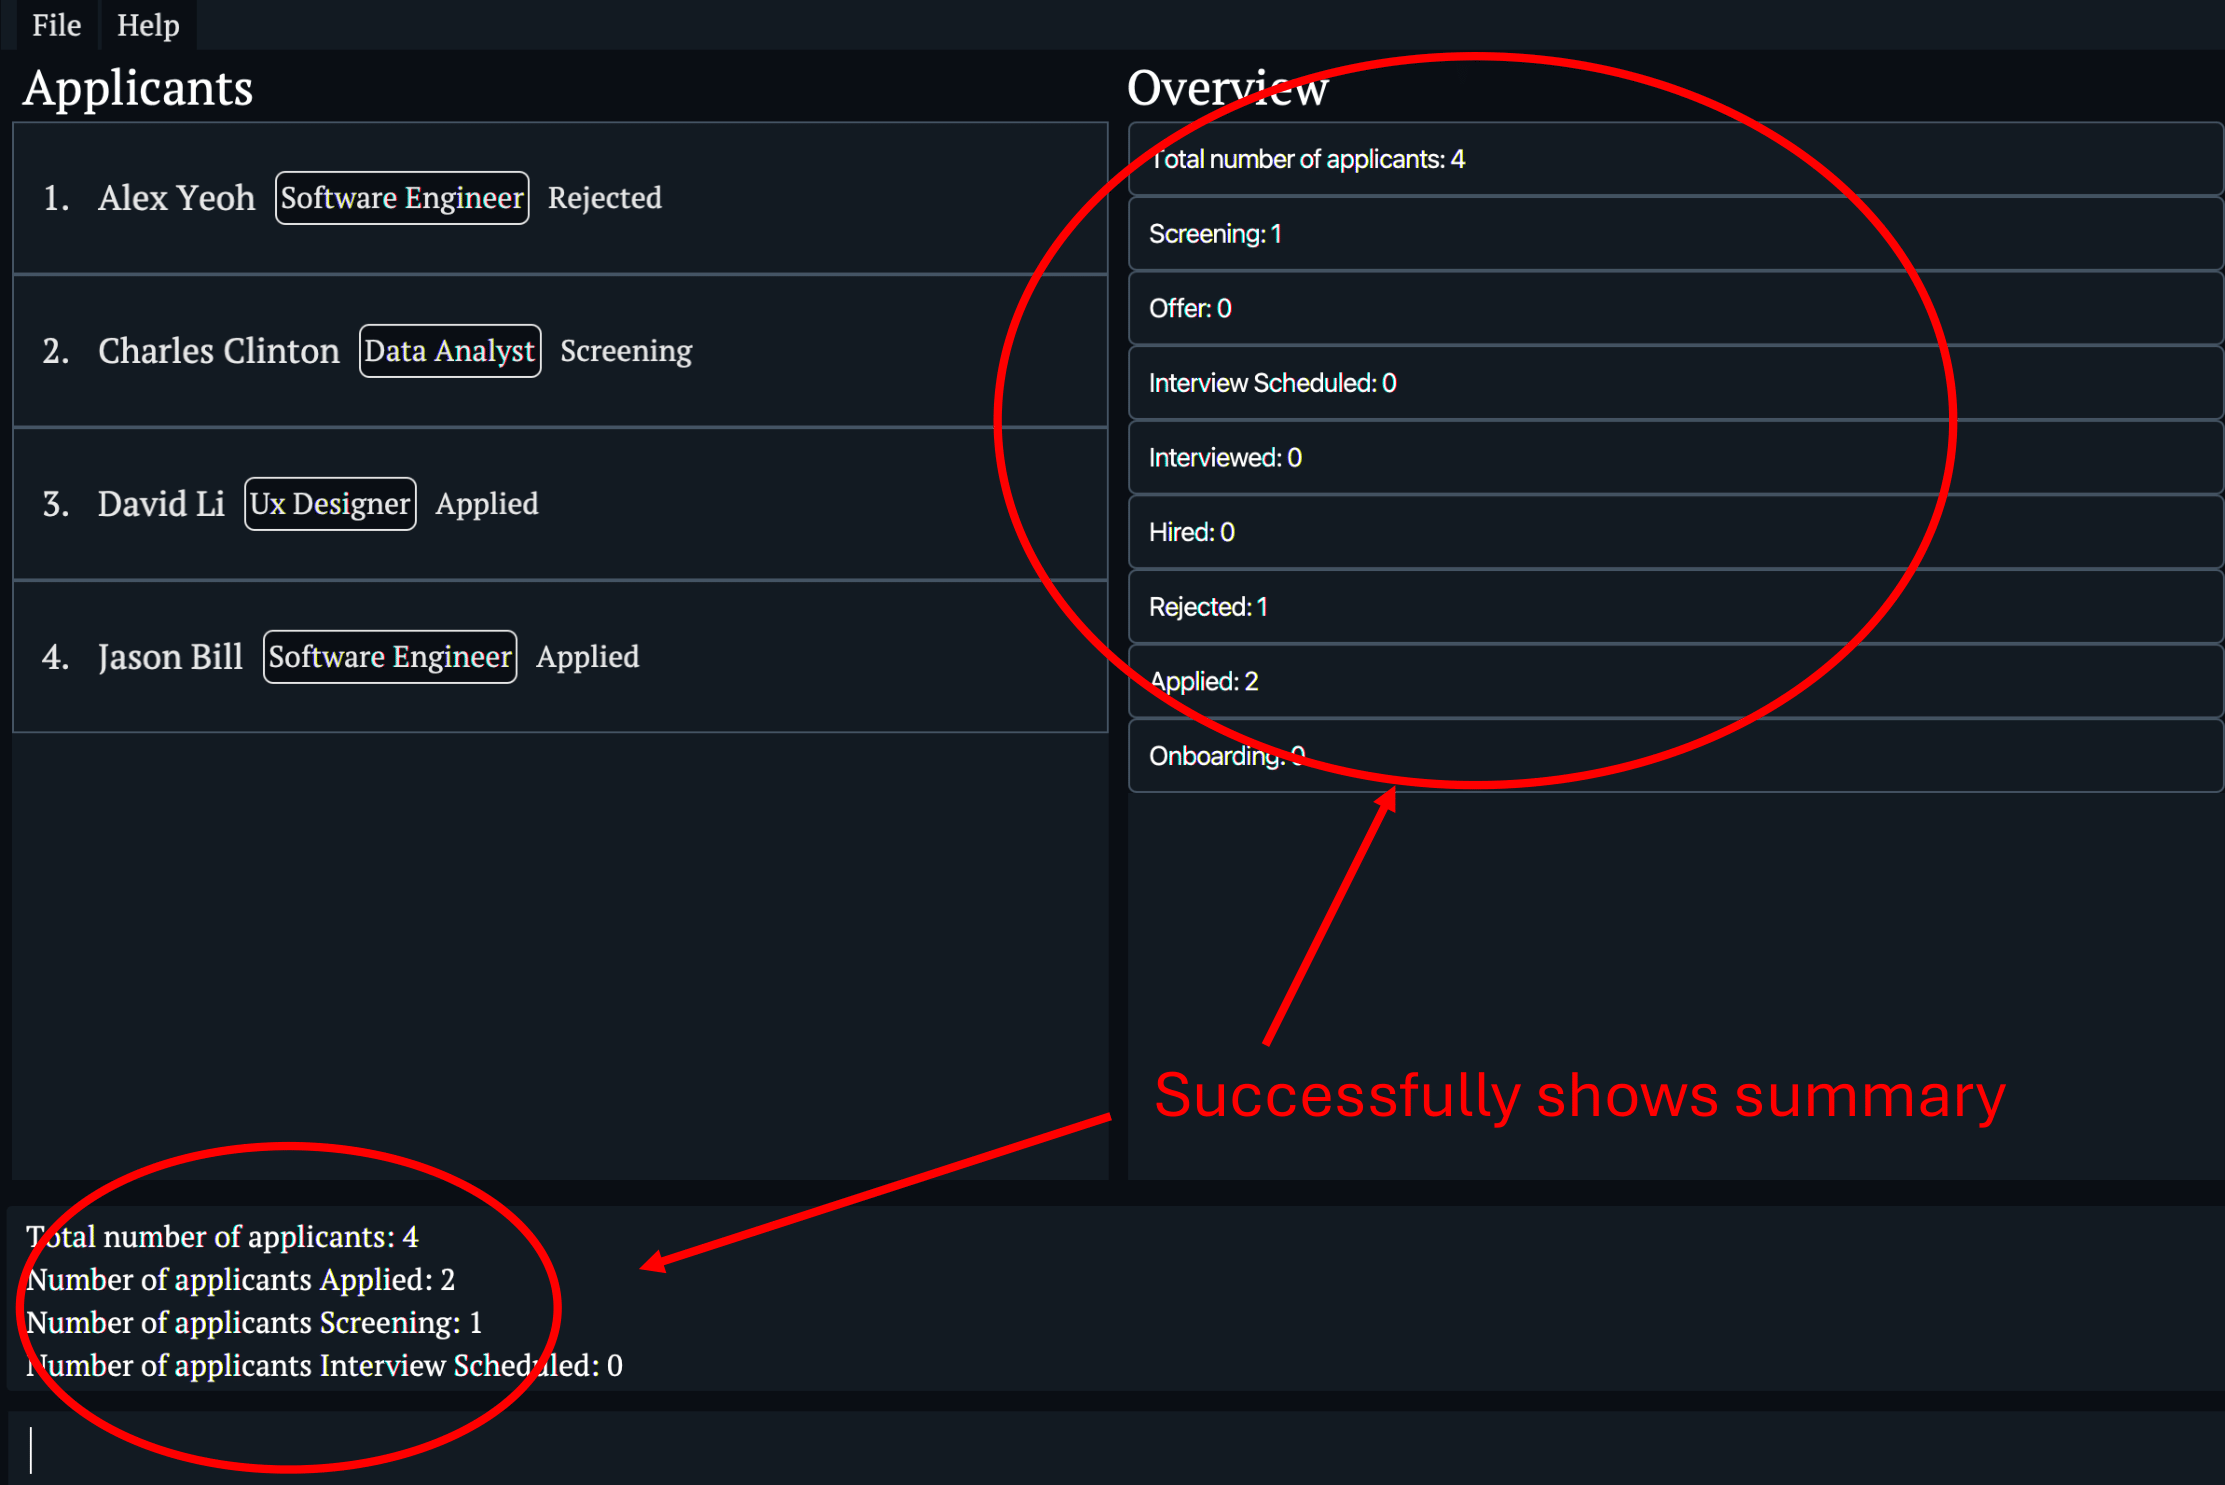
Summary Output Example: The summary will display information such as:
- Total number of applicants
- Number of applicants in each status (e.g., Applied, Screening, Rejected, etc.)
This quick view allows you to monitor the distribution of candidates across different stages.
[Tip]: Use the summary command regularly to keep track of your recruitment pipeline’s health and quickly identify any bottlenecks in the process.
[Caution]: Please call the summary command again after modifying data to refresh the changes.
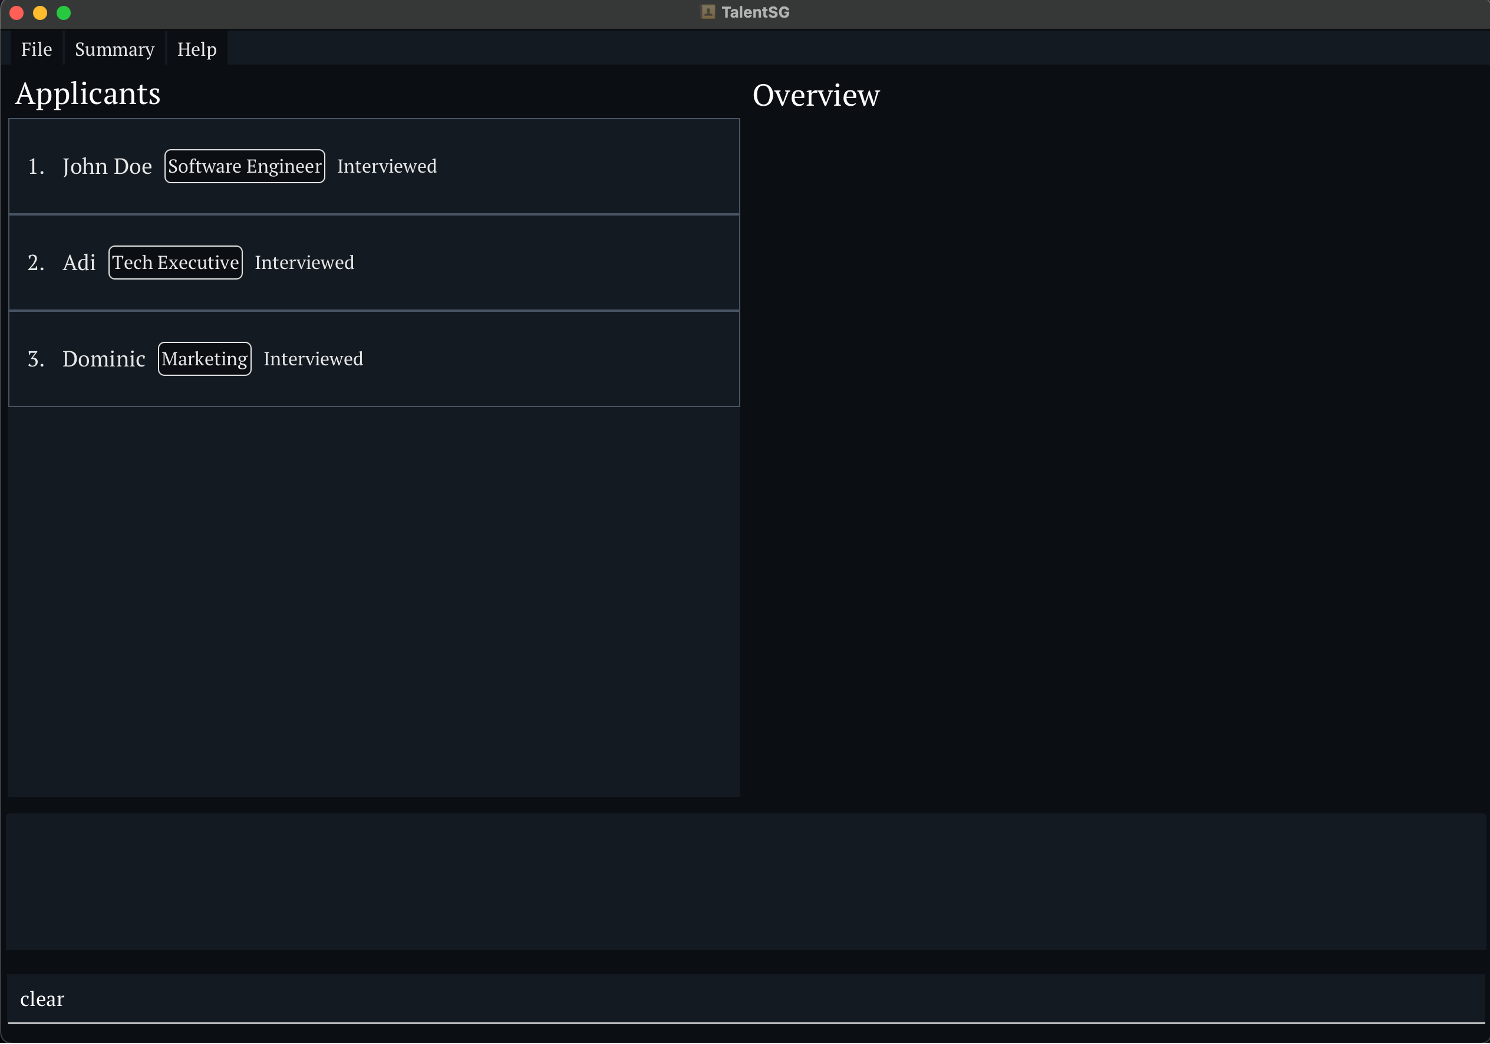
Clearing All Entries: clear
Removes all candidates from TalentSG.
Format: clear
Image Example
Before the clear command ran:
After the clear command ran:
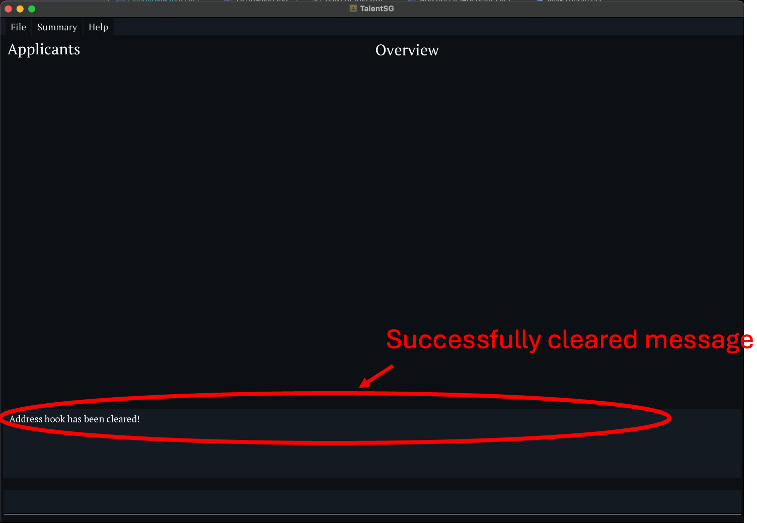
[Caution]: Clearing all entries is irreversible. Make sure you have a backup if you want to retain the data for future reference.
Exiting the Program: exit
Closes the TalentSG application.
Format: exit
Image Example
Running the exit command:

Saving Data
Data is automatically saved in the hard disk after any command that changes the data. There is no need to save manually.
Editing the Data File
Advanced users can edit the data file located at [JAR file location]/data/addressbook.json.
[Caution]:
- If your changes to the data file make its format invalid, TalentSG will discard all data and start with an empty data file at the next run.
- It is recommended to take a backup of the file before editing it.
- Certain edits can cause TalentSG to behave unexpectedly (e.g., if a value entered is outside of the acceptable range). Therefore, edit the data file only if you are confident that you can update it correctly.
Reporting a Bug
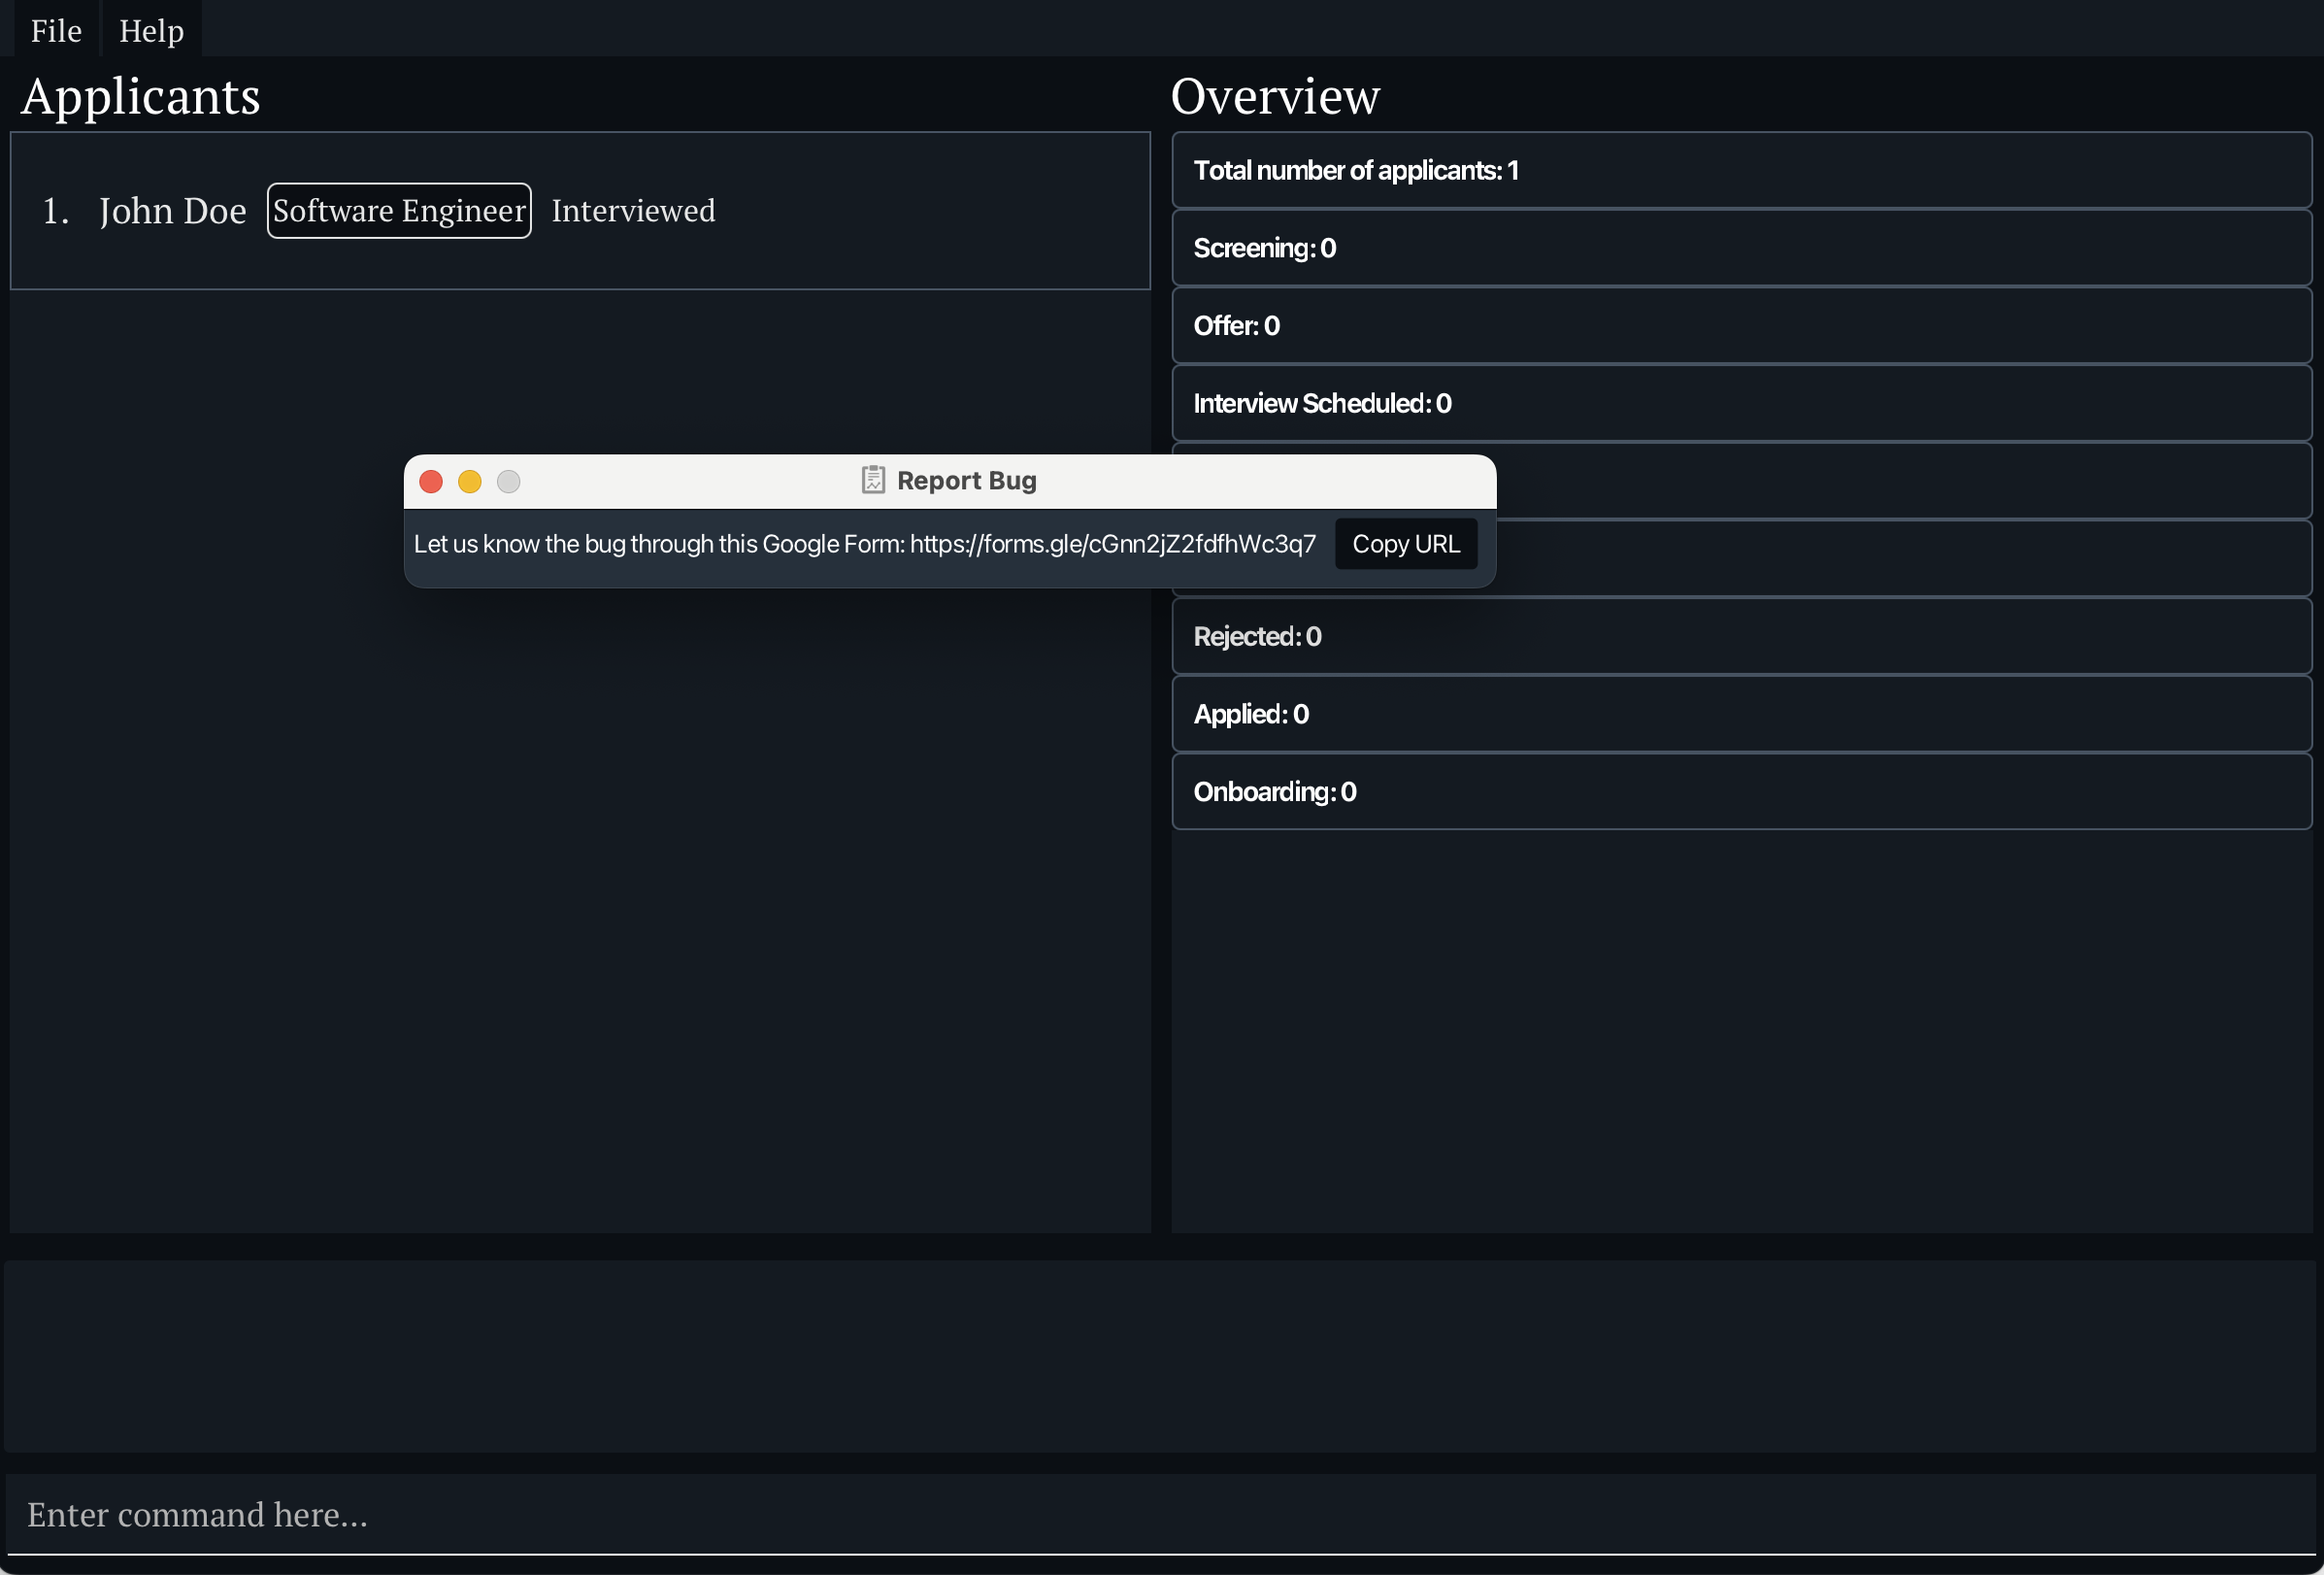
If you encounter any issues or bugs while using TalentSG, you can easily report them through the Report Bug feature. This feature allows users to submit feedback directly through a designated Google Form.
How to Report a Bug
- Open the Report Bug Window:
- In the TalentSG application, go to the Help menu at the top and select Report Bug.
- This will open a pop-up window containing a message and a link to the bug report form.
- Copy the URL:
- Click the Copy URL button in the Report Bug window to copy the Google Form link to your clipboard.
- The message displayed will be: “Let us know the bug through this Google Form: https://forms.gle/cGnn2jZ2fdfhWc3q7”
- Access the Google Form:
- Open your browser, paste the URL from the clipboard, and complete the Google Form with details about the bug.
- Be as descriptive as possible to help us identify and resolve the issue effectively.
Example Image
Below is an example of the Report Bug pop-up window that will appear when you access the feature:
Notes
- Internet Connection: Ensure that your device has an active internet connection before accessing the Google Form.
- Privacy: Your feedback will be used solely for improving TalentSG. Any personal information provided will be handled according to our privacy policy.
[Tip]: Reporting bugs with detailed steps and screenshots (if applicable) can help speed up the troubleshooting process.
[Note]: “Report Bug” is accessed through the Help menu and is not a command that can be entered in the application’s command line interface.
Archiving Data Files [coming in v2.0]
Details coming soon …
FAQ
Q: How do I transfer my data to another Computer?
A: Install the app in the other computer and overwrite the empty data file it creates with the file that contains the data of your previous AddressBook home folder.
Q: Help! Double-clicking TalentSG.jar does not launch the application - what should I do?
A: Try running the application from the command line using the following command: java -jar TalentSg.jar. Windows users can use the Command Prompt application to do this while Mac users can use the Terminal application.
Q: When I minimise the application, the entire application has shrunk and now it is gone! Help!
A: Currently our application do not allow diagonal or vertical resizing of it. It is best not to resize the application at all and leave it as the maximised mode. For this problem, we suggest that you try to maximise the application from the task manager or try to split the screen with another application so that TalentSG will resize back to normal. If the mentioned solutions fail, please do download TalentSg again!
Q: How do I save my data?
A: TalentSG saves your data automatically after every command.
Q: How do I update to the latest version of TalentSG?
A: Simply download the latest .jar file released on our GitHub page.
Glossary
Interfaces
-
CLI (Command Line Interface): A text-based interface where users type commands to interact with the application, providing faster and more precise control than a graphical interface.
-
GUI (Graphical User Interface): A visual interface that lets users interact with the app through graphical elements like buttons, icons, and windows, making it more user-friendly.
Commands & Formats
-
Command Format: The structure in which commands are entered in the CLI. It includes keywords, parameters, and optional elements that allow flexibility in entering information.
-
Command Parameters: Specific data (e.g.,
NAME,PHONE_NUMBER,EMAIL) you supply when using commands to customise their actions. Parameters may be required or optional, depending on the command. -
Placeholder Value: A generic example value in command formats (e.g.,
n/NAME,p/PHONE_NUMBER) that shows where users should insert their own specific information.
Data & Fields
-
Index: A number indicating a specific item in a list, such as a candidate or job entry. For example, the index “2” refers to the second item displayed in the current list.
-
Status: A label representing the current stage of a candidate in the hiring process (e.g., Applied, Interviewed, Hired). Useful for filtering and organizing candidates based on their progress.
-
Tag: A custom label that can be added to candidates, like “friend” or “urgent,” to help categorize or prioritize them. Multiple tags can be assigned to each candidate.
-
Field: An attribute or property of a candidate, such as “Name,” “Phone Number,” or “Email,” that can be edited or displayed.
Functional Categories
-
Module: A feature grouping within TalentSG that includes functions related to candidates and job roles, such as adding, listing, and filtering candidates.
-
Filter: A command that narrows down displayed candidates based on specific criteria, such as “status” or “skills,” simplifies searching and management.
Resources & Links
-
Hyperlink: Underlined and often blue text within the document that, when clicked, redirects to external resources, guides, or downloads. Requires an internet connection.
-
File Path: The directory location on your computer where specific files are stored (e.g.,
[JAR file location]/data/addressbook.json), is often used when accessing or editing files. -
Backup: A saved copy of the data file, is recommended before making manual changes to avoid data loss.
Status Glossary
The Status field in TalentSG indicates the applicant’s current stage in the hiring process. HR professionals can use these definitions to maintain consistency, but they can also interpret them based on their specific use case.
- Applied: The applicant has submitted their application, but it has not been reviewed yet.
- Screening: The application is currently under initial review or pre-interview screening.
- Interview Scheduled: An interview has been arranged, and the applicant has been informed.
- Interviewed: The applicant has completed their interview, and the HR team is assessing the results.
- Offer: An offer has been extended to the applicant, but they have yet to accept or reject it.
- Onboarding: The applicant has accepted the offer and is currently in the onboarding process.
- Hired: The applicant has completed onboarding and is now a part of the organization.
- Rejected: The applicant was not selected to continue in the hiring process. This status applies whether:
- The company decided not to proceed with the application, or
- The applicant withdrew or rejected the offer.
Note: If an applicant voluntarily withdraws or declines the offer, it can be marked as “Rejected” for record-keeping. Use tags or notes to clarify details, such as
tag/withdrawnfor easy future reference.
Additional Tips
- Customizing Status Tracking: HR professionals may add tags (e.g.,
t/withdrew) for additional details alongside the main status. - Updating Status: Ensure that statuses are updated promptly to reflect the most current applicant stage, improving recruitment tracking and reducing confusion.
Acknowledgements
This project is based on the AddressBook-Level3 project created by the SE-EDU initiative.